July 27th, 2012
Anna & Scott Sadler
This week’s installment of our Stencil Star™ series features the incredible works of Arizona-based husband and wife team, Anna & Scott Sadler of Surface Refinements. They use Modello Designs vinyl wall stencils and patterns in ever-creative and ways for many unique surfaces, such as mirrors and ceilings and also within their decorative paint finishes. Their love of design and patterns enable them to incorporate stencils in most all of their projects.

Anna & Scott Sadler
ABOUT SURFACE REFINEMENTS
Anna’s art business operated under different names for over 20 years, and had been based at times in Montreal, Naples (Florida) and Monte Carlo. She spent 5 years in the South of France and owned two art galleries in Monaco. She spent a summer in Tuscany studying fresco painting and took a watercolor and illustration class in St Paul de Vence, France with Ringo Starr and his wife Barbara Bach. The former Beatle and his actress wife were clients, as was Prince Albert of Monaco and several Formula One race car drivers. Then, talk about opposites attracting! Scott was a police officer in Toronto and personal trainer in Montreal. Anna was an accomplished artist who gave little thought to fitness. They met, fell in love and became successful business partners. Anna got interested in fitness and nutrition, and alternately, Scott in her growing business.
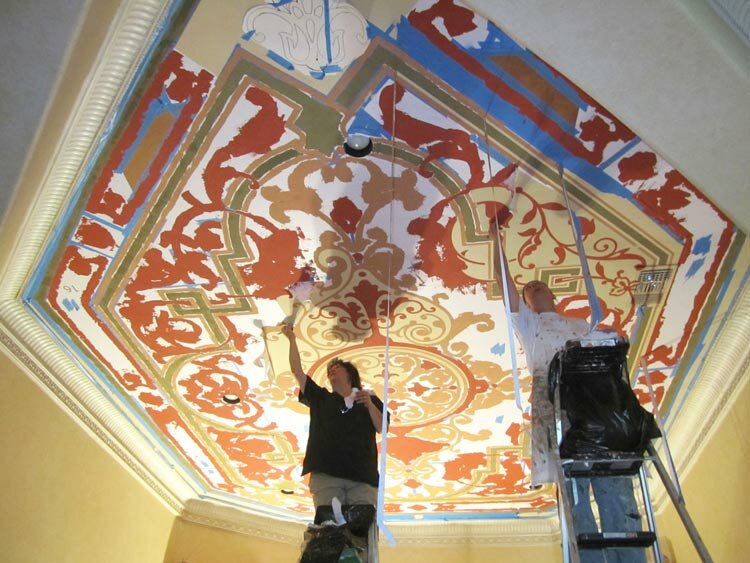
Now, the Scottsdale, AZ residents and native Canadians are a couple in every sense of the word. Surface Refinements specialize in hand applied finishes, encompassing every surface in a home, from walls, ceilings, mirrors and some furniture. Each project they undertake is a team effort. Gypsies at heart, they have enjoyed living in many destinations, having a transportable business that has afforded them many opportunities to explore the world. Their vision is what drives them to undertake what might be considered the impossible, and it is that vision realized that is so rewarding to them — the magic is when tape is pulled and the vinyl, the plastic and the furniture gets placed back in the room. Today, they are two individuals successful as one in a partnership that encompasses both their business and personal lives.

(above) A Modello Carpets & Panels vinyl stencil (Chateau CC118) is applied here over a chocolate and cream base along with several colors of leafing and tamise flakes.
How do Modello Designs vinyl stencils enhance your business?
Modello decorative stencil patterns enhance our creative business by giving us the ability to create old world craftsmanship with a modern application. We always approach every new project as an opportunity to enhance the spaces with the use of a Modello. Every surface from the walls to ceilings and mirrors are opportunities to create stunning visual and complex depths of pattern and color, with the use of leafing, plasters, glass beads, glitter and foils. The beauty of Modello masking adhesives is the ability to achieve these results without the need to spend months of time creating them.

Antique mirror and patterned surfaces are a specialty for Anne and Scott. (above) The mirror was aged and then patterned with a Modello Ancient Motifs stencil (AncMot312). It was the finishing touch to a Chicago penthouse foyer. The entire project had a Greek theme to it and the pattern set the tone perfectly upon exiting from the elevator entry. (below) The first image is a bath mirror with a Modello Ornamental Pattern (OrnPan186) which customized for the niche shape. The second is a customized ornamental panel stencil from the Modello Hearst Collection (OrnPan 108). “Melanie Royals was instrumental in tweaking that pattern to work for the space. We used gold leafing and shellacs, and aged the mirrors to give a more antique and masculine feel,” Anna shares. “The client was ecstatic!”


What are your favorite surfaces to work and design Stencils for?
Well, our necks may not agree, but our favorite surface has to be ceilings. We are fortunate to work in homes that have some pretty outstanding architectural surfaces just begging to be showcased and enhanced with pattern. Ceilings are definitely a focal point and are ideal places to apply a design, setting the stage for spectacular dramatic effects that compliment the rest of the interior. If I can slide in our second favorite surface, it would be mirrors. We are so enjoying the creativity involved with applying pattern to mirrors. They have become our canvas of choice! It’s a fascinating process where we are able to take brand new mirror, and by using the antiquing solution to the reverse side of the mirror, we are able to create the look of old tarnished antique mirror. Further enhanced by pattern, every piece is truly unique in the creative partnership we have between Mother Nature and ourselves!

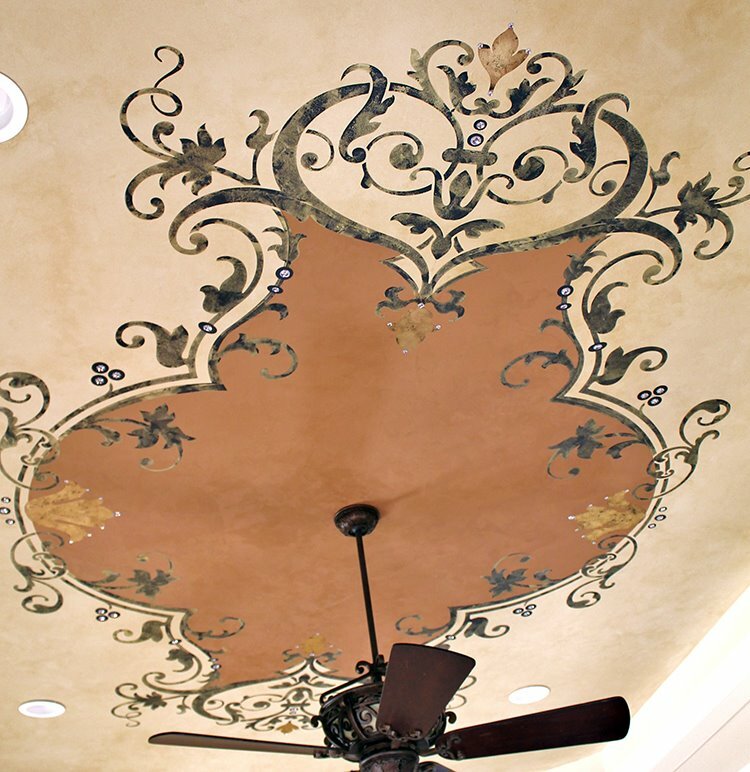
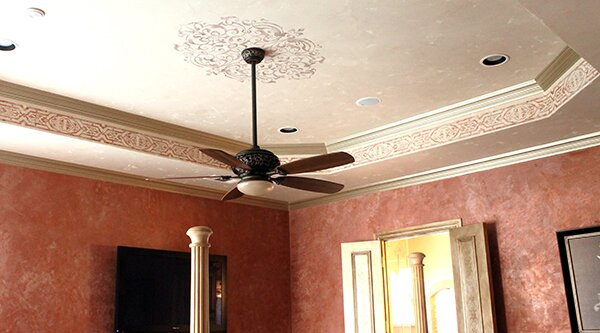
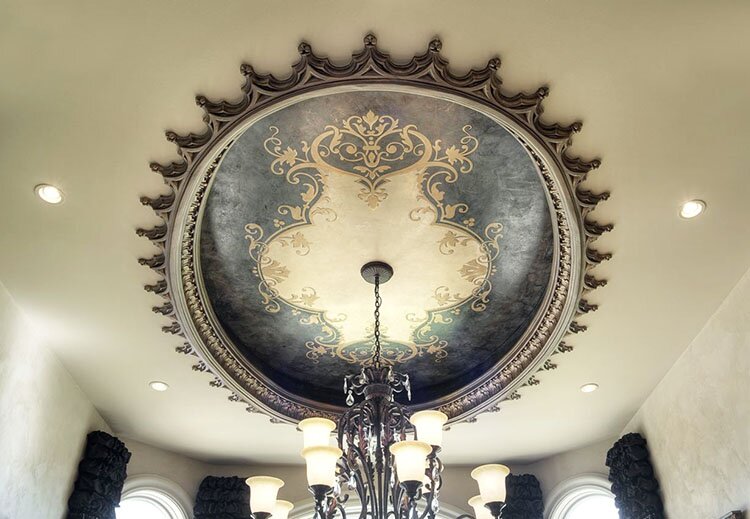
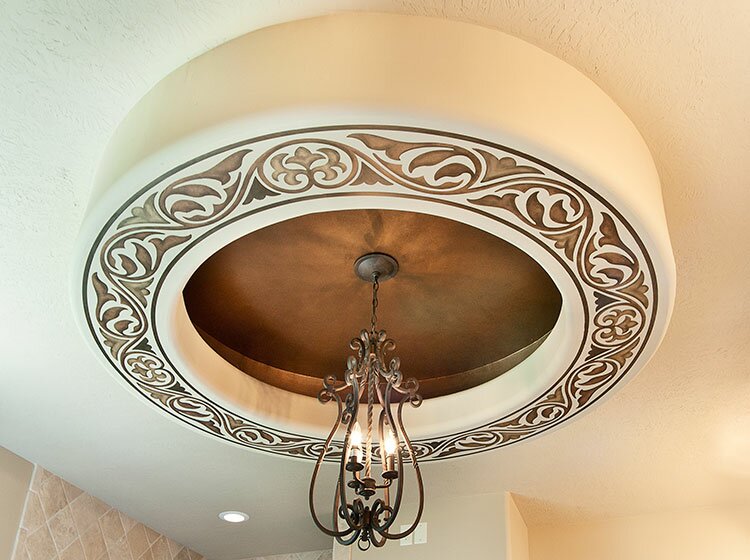
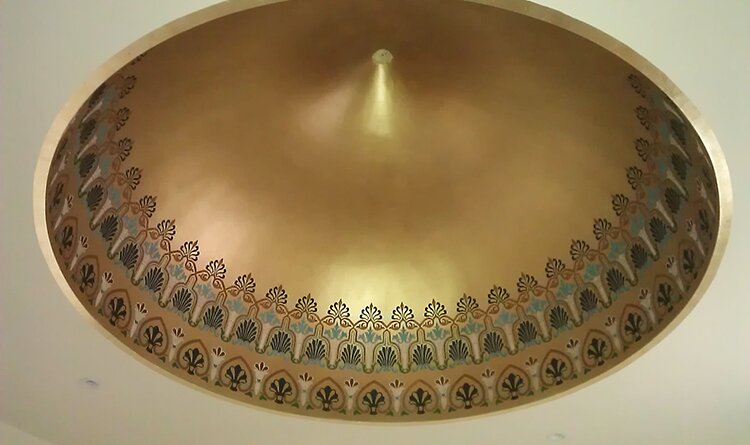
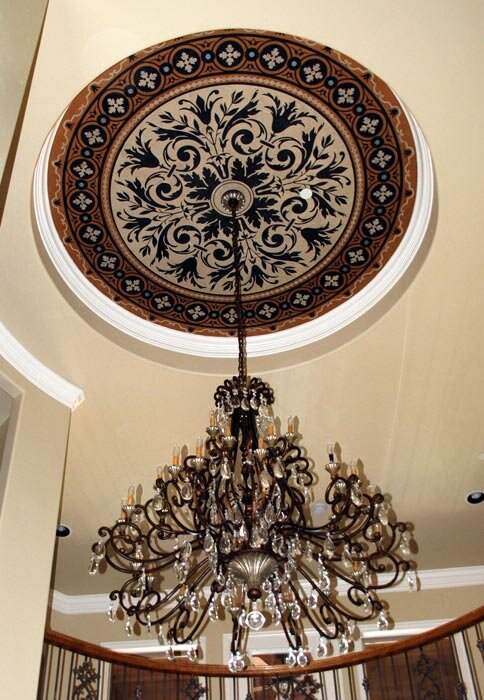
(above) The large dome was done with a designer foil in a copper green gloss, with the double borders done with a combination of celestial leafing for one of the borders and a three-color metallic finish for the other. Both are Modello Ornamental Border vinyl stencil patterns (OrnBor101 and OrnBor154). (below) The dome ceiling was an Old World plaster technique using various Faux Effects products, and then the team at Modello designed a custom Modello Ornamental Motif pattern (OrnMot176) for the insets.

What is your top Stenciling tip?
Number one rule with us is measure, measure, measure! One can never be too accurate and we triple check ourselves to be absolutely certain we are bang on with our measurements that are submitted to the design team at Modello Designs. One tip that has been helpful in the numerous odd shaped ceilings and domes we do, is to use tape to measure around the perimeter for the border. We run the tape around the circular border, then remove the tape, lay it on the ground, and measure the tape. Works perfectly every time!

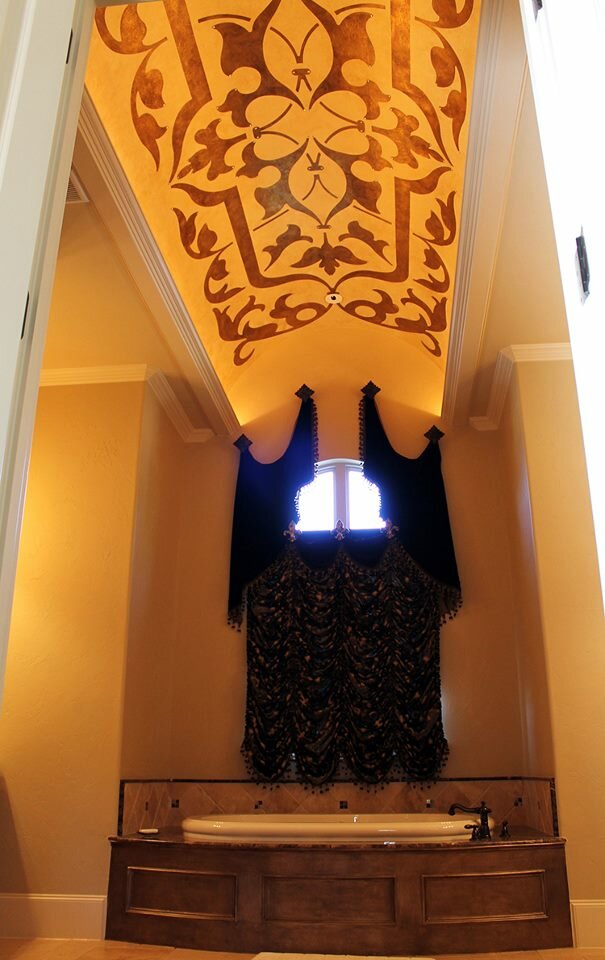
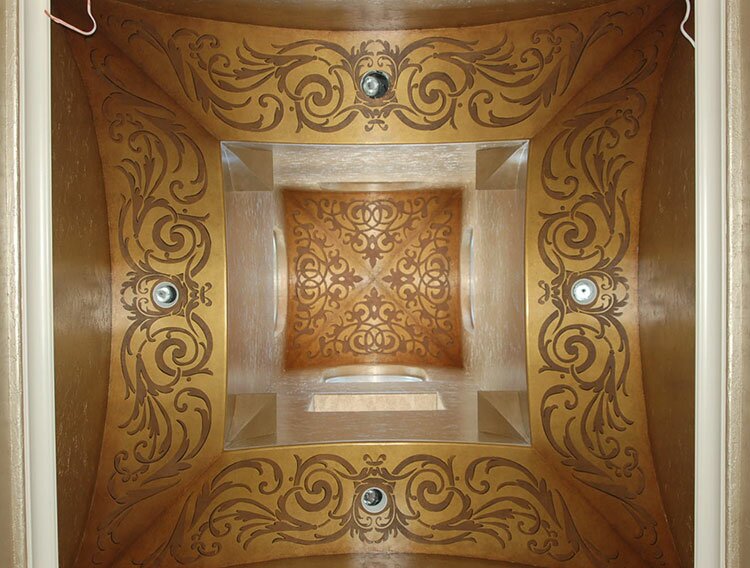
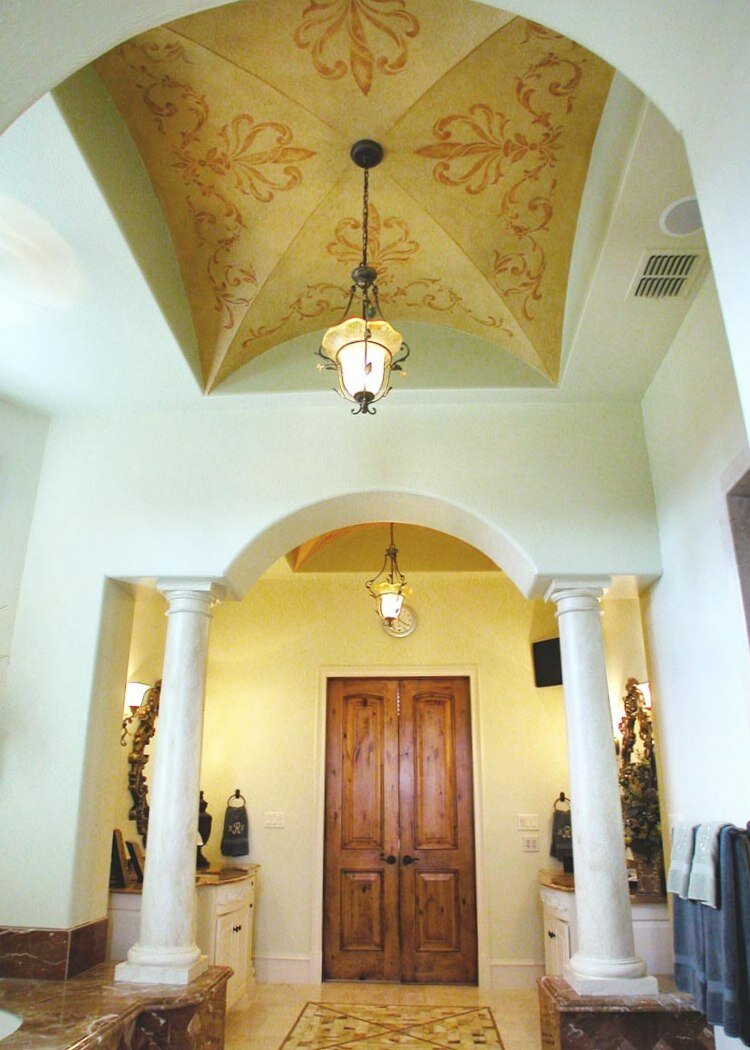
(above) The beautiful groin ceiling was done with a custom 4-color plaster treatment over a coppery-gold designer foil. The pattern was customized and based on a Modello Architectural Center stencil (AchCen206).
Another tip we use when working on groin ceilings or niches, is to make a template out of Kraft paper or lighter weight Rosin paper, in addition to all our measuring, and send that along to the Modello team. We also like to order a paper plot of the design on more complex groin ceilings, to get a good visual prior to finalizing the Modello order in vinyl. If there is any tweaking or adjustments to be done, it’s WELL worth taking the time to double check with that paper plot at a fraction of the cost of the Modello vinyl stencil.

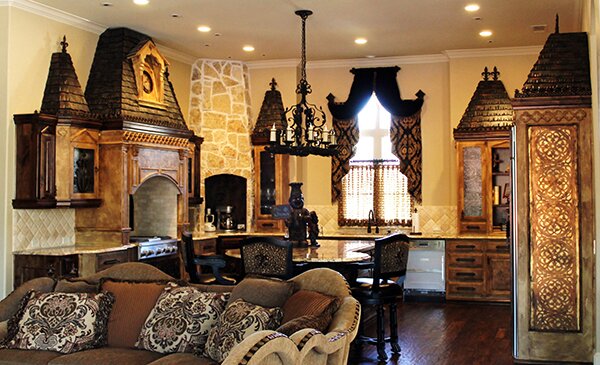
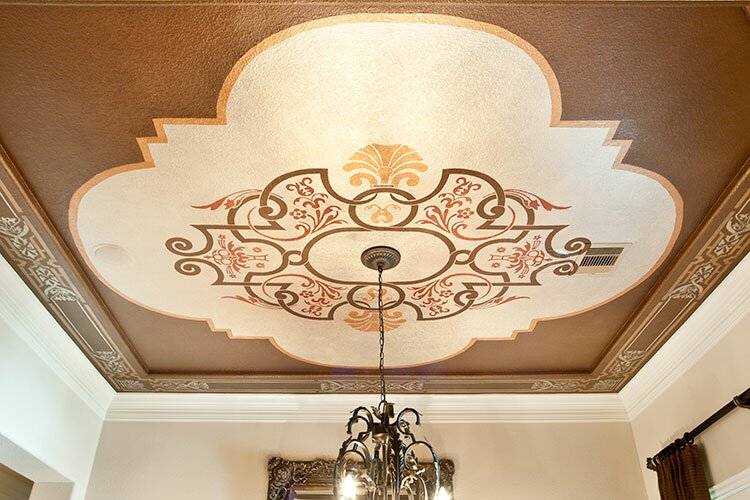
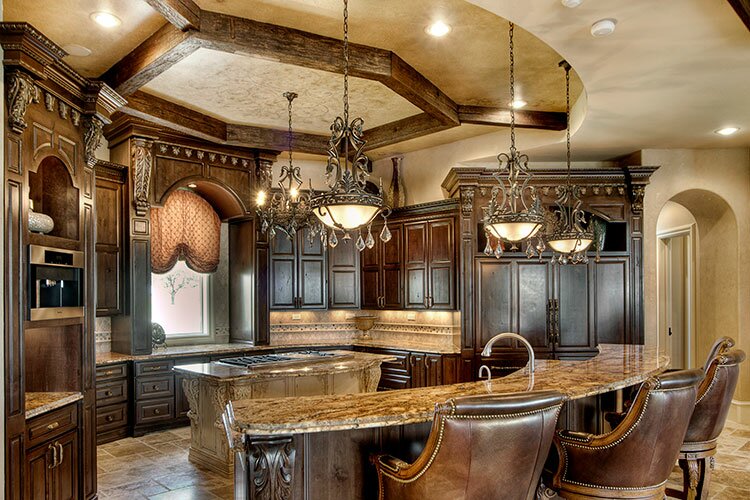
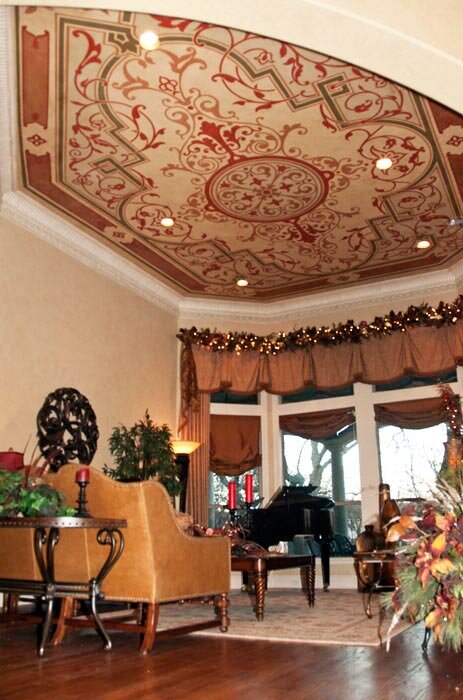
(above) This dining room stunner was created with a Modello Carpets & Panels vinyl stencil (ChavallCC105) which is perfect for ceilings, too!
Anna and Scott are so creative with patterns and designs on any surface — it’s no wonder their artistry is exemplary! We have profiled some of their more unique projects before as well. Do be sure to keep up with them on their Facebook page, Surface Refinements. Many thanks to them both for their enthusiasm and design savvy with our Modello vinyl stencil patterns and innovative finishes!
July 12th, 2012
Stencil Star: Maggie O’Neill
In this weeks installment of our weekly Stencil Star™ series, we feature the hottest restaurant designer in D.C., Maggie O’Neill of O’Neill Studios. She and her team of artists create some of the most innovate decorative painting finishes incorporating Royal Design Studio wall stencils and patterns in her creative, contemporary projects. She also weaves in fresh color combinations and stencil designs in her fine art pieces. I first met Maggie when she came on our 3rd Peacock Painting adventure to Marrakech: The Tent Trip! I can tell you that she is even more fun than she looks!!!

Maggie O'Neill
ABOUT O’NEILL STUDIOS
Maggie O’Neill is a Washington, DC based fine artist and the Creative Director of O’Neill Studios, the decorative painting company she founded in 2001. Maggie attended the College of the Holy Cross in Worcester, MA and pursued a Masters Degree of Fine Art at the University of Georgia, enrolling in their Cortona, Italy program. “In Italy, I was moved by the rich art history of the Renaissance and the integration of commissioned fine art during this period,” she says. Maggie focused on drawing and painting (concentrating on portraiture) and the decorative arts, with her studies also including Fresco painting.
After Italy, Maggie continued to travel, eventually living and working in Tamarindo, Costa Rica, where she completed her first commercial exterior mural. “It was at this point that I fell in love with the creation of utilitarian and public artwork that the surrounding community could enjoy.”
Returning to DC, she decided to continue working in the vein of commissioned artistry and opened O’Neill Studios in 2001. In the time since, Maggie has built O’Neill Studios into one of the most well-respected decorative finishing companies in the Washington area. The team’s productions can be seen in some of the city’s most notable private residences, embassies, churches, restaurants and commercial spaces.

A custom Modello vinyl stencil design on a restaurant ceiling.
How do you determine which pattern will work for your project?
There is never just one determining factor of why or what pattern I will propose to a client. Sometimes we have an inspiration paper or fabric to work from and the project becomes about replicating the same properties; scale, color, etc. I typically think about the following three features of the space to select patterns and stencils that will work: Style, Scale and Palette. What is the style of the space? Does it require something stylized with a high level of impact or something more delicate and understated? What is the existing palette working in the space? Do we need to introduce more color or keep it a neutral pattern to create a backdrop for other features or artwork? What features in the room allow us to play with the scale of the pattern?
I think to have a stencil custom-made to scale for your space is the smartest thing anyone can do when introducing allover pattern. You may love a pattern on a sample fabric or even an item of clothing but it’s not right for your ceiling or the back of your bookshelves. Any of these things can direct you to the right stencil and technique. I highly recommend doing some research into the style or look you are trying to achieve before purchasing. Also, cutting out shapes to the scale of what your thinking and understanding where they will repeat and run off, measuring the space to understand where it will start and stop is also helpful.

At the OYA Restaurant in DC, Maggie and her team add 3-D elements to the Allover Fabric Damask stencil for both furniture tabletops and walls. So inventive!

Please share your top Stenciling tip with us.
My favorite technique is a bit messier then the average application. I enjoy seeing the interruption of one color and the introduction of another. I also prefer to see a bit of depth in the application. For this reason my favorite technique is a drop shadow or a “pulled silk” effect. This is at least a two layer stencil technique. The first layer of glaze or paint is a bit slippery so that it has a longer open time and transparency. Immediately after you stencil, you use your brush like a strie brush and pull through the pattern lightly. Pulling one direction is important. I prefer to use gravity and pull down. The second layer is the same stencil (cleaned off of course) and place the stencil about 1/8- 1/4 of inch above where you originally set the first layer. Using a lighter more opaque color is helpful to achieve a raised appearance. This creates the look of hand worked fabric or pulled silk or ikat look.

Maggie also enjoys creating fine art pieces and incorporating stencils within. Here, the Intricate Zelij wall stencil from the Allover Moroccan Stencil Collection supports the supports and enhances the beautiful central figure.
How does stenciling enhance your creative business?
My business is ALL about how creative I can be for my client and how can I work with what they already have. Turning something totally ordinary to something extraordinary has been the cornerstone to my business. Initially, stencils gave me the ability to offer high impact results with relatively quick turnaround and affordable prices. However, stencils have pushed open new creative doors for me as an artist and designer. I experiment with more techniques and applications that include 3D elements and unconventional methods . I am constantly looking to wallpaper and textiles for inspiration and take note of the techniques used to create nuances in each design.

Maggie working with our one of our Modello Ornamental Center patterns (OrnCen162) in a more traditional space.
Stencils are tools this are just as important as the paint itself, allowing me to explore new methods. I now examine every space and surface with a different perspective and understanding of how to embellish or apply pattern. I realize that you don’t need to stencil everything BUT YOU CAN! The creative options stencils have introduced have overflowed in to my own fine artwork and now end up in most of my paintings. Stencils have been a juggernaut for my creative business and have opened the doors of my portfolio to include fabric for window treatments and table runners, wrapping paper, furniture makeovers, and even clothing.

At the Irish Whiskey Lounge, Maggie mixes both Modello vinyl stencils and traditional mylar stencils to incorporate multiple patterns, textures and typography to create an unforgettable stairway. Pictured is our Endless Circles Lattice, the Moroccan Arches and Chez Ali stencils — all from the Moroccan Stencil Collection.

Maggie is a creative visionary who designs incredible, contemporary spaces. Do yourself a favor (and be prepared to spend some time!) by browsing both her sites, O’Neill Studios and Maggie O’Neill Fine Art. For a more personal look, follow Maggie and her painting team via her two Facebook pages, O’Neill Studios and Maggie O’Neill Fine Art as well.
July 5th, 2012
Stencil Star: Rachael Goddard
In this weeks installment of our weekly Stencil Star™ series we feature designer and artist Rachael Goddard of Paint/Design/Décor. Based in Los Angeles, she frequently designs her client’s homes from the ground up and easily incorporates her love of pattern and color, using our wall stencils and patterns in many of her design and decorative painting projects.

Rachael Goddard and son
ABOUT RACHAEL GODDARD
Rachael Goddard is a California-based interior designer and artist who specializes in all aspects of design from space planning, color consulting, wall stenciling and exterior design to residential remodels and new construction. After studying design at the prestigious Parsons design school and Cal State Northridge, Rachael landed her first design job at the age of 24 acting as the project manager for a multi-million dollar commercial development. She fell in love with all aspects of the design, especially working with architects, creating furniture plans and office layouts, and overseeing the construction of the build. This was the beginning of a love affair with the design process. Years later, her first new construction residential project was nominated for a design award.
Although Rachael is anchored in design, it is her love for fine art that, for several years, had Rachael spending nights and weekends working as a fine artist and faux finisher. She was commissioned to do large-scale restaurant chains and luxury real estate development sample homes in addition to her beloved residential projects. In 2002, all of these elements came together when her company Paint/Design/Décor was born. Now Rachael provides a full service design firm addressing every element of home design from start to finish.
Rachael’s work has been featured on several design shows. Though she has been asked to be on-camera, she has chosen to stay out of the limelight, preferring to enjoy her quiet life with her two children and husband at home in Los Angeles.

Rachael often uses Royal Design Studio wall stencils to enhance a client’s home in classic patterns and colors. In the above hallway, the Moorish Trellis allover wall stencil is striking and incredibly elegant in metallic over black. Below, a more muted palette creates a warm and luxury-rustic feel with the Large Fabric Damask. For this project, she did the wall stencil first and built the room around it while adding the panel molding and custom-made chairs later.

How do you determine which pattern will work for your project?
I determine which pattern to use by imagining every stencil pattern in that space and selecting the one that works the best in my mind. I can only liken it to the movie “Inception”- Some people like myself have this gift where we can visualize everything in our minds. I picture exactly what that room will look like and thus, through process of elimination determine what would be too large of a print, too small, too busy, too intricate. I realize that many people can’t visualize, so I often use Photoshop as a tool to communicate how the wall stencil will work in the room. I find that doing a virtual mock up of the room for my clients is just invaluable.
After the project is done, everyone is always so relieved, surprised and excited. I’m always like, “Yep, it’s exactly how I pictured it to be…”. My enthusiasm comes earlier in the project when I see it for the first time in my mind, which is probably how I convince them to do it in the first place. I’m like that with all of the elements of design: designing floor plans, bookshelves, kitchens, closets, sofas… In the beginning I am super pumped up during the creative process when everyone else is nervous and scared. For me, it’s like you are all dressed up and alone at a party, excited, dressed up waiting for someone to show up…then by the time everyone gets there, you are bloated from eating too many appetizers, the buzz from the champagne has worn off, the spanx are feeling a little snug and you are thinking about comfy pj’s and what you want to watch when you get into bed!


Above, the Feathered Damask stencil from the Allover Damask Stencil Collection looks amazing, crisp and perfectly nestled within the design of the room. “I designed the whole bathroom around this wall stencil, from the plank of wood to the bowl and faucet. It was an amazing transformation form the dingy, horrible and depressing little space to the cool, modern and bright space it is now,” Rachael explains.
What draws you to Wall Stenciling?
I am drawn to stenciling because I get the look of a hand-painted wallpaper without the excessive price tag and commitment. With my stencils I can achieve the look of wallpaper but I have the freedom to use the paint colors I have implemented throughout the rest of the house, so that everything culminates in that one space and joins together in the stencil pattern. I also love the freedom that comes with using wall stencils versus a wallpaper…like the option to change a room on a whim.
")

Children’s rooms are a particular joy for Rachael. In the images above, she used various wall pattern stencils to create a collage of color and patterns within panels in her son’s room. Below, she brings wonderful stencil patterns to a “pretty-in-pink” girl’s room.

It’s good to keep in mind that an allover stencil doesn’t have to be used in the traditional way. For instance, Rachael used individual elements of the Florentine Damask pattern to create a wonderful accent focal wall for the girl’s room above. In the alternate, she used the Fortuny Damask design in an allover wall pattern in the nursery below, stopping just below the crown molding. Wall stencils are incredible versatile because you can stencil as much or a little as you want!

What would be your “dream” stencil project?
My dream stencil project is anything inside my own house. I don’t have to worry about anyone else liking it- I don’t have anyone worried it isn’t going to work and having to convince them it’s going to be amazing. I can pick a concept that is totally outside the box. I get to sit up at night after the kids go to bed and put on some music, get out the roller and some artist brushes and just do it. I often get caught up in doing the main part of my design business, which is more interior design and architectural planning, but when I go to a client’s house with my small brushes to do the technical work and I’m on that ladder with my painting clothes on, it just feels like home to me. It’s like a two hour massage, I’m so relaxed afterwards. Except when I do ceilings, then I need a two hour massage!! Ha!

The Pro Delicate Floral Stencil adds a bit of romance to an office (above). The Pro size is very useful when a large space will receive an allover wall stencil treatment — it is sized with more stencil repeats to allow for a faster painting process.
We are super thrilled to share Rachel’s stencil work with you today!To see more of Rachael’s incredible work, please visit her unique website for her company, Paint/Design/Décor where she has created a lovely, inspiring flipbook for you to easily view her inspiring design skills. Her skill, creativity and professionalism serve to elevate the art of stenciling. We are SO appreciative of her sharing her innovate and creative ways to use stencils to design contemporary, modern spaces!
June 29th, 2012
Stencil Star: Amy Christensen
Our weekly Stencil Star™ series showcases our customer’s use of our Royal Design Studio mylar wall stencils and Modello™ masking stencils on walls, ceilings, floors, and more. This week, we travel to Dallas, Texas to see the beautiful work of Amy Christensen and her studio, Faux Get About It. Amy wields her considerable creative skills with stencil patterns in many of her decorative painting projects.

Amy Christensen
ABOUT FAUX GET ABOUT IT
Amy Christensen has always had creative pursuits: sewing, cooking, painting, stained glass and remodeling, to name a few. However, after working in the advertising and marketing fields for many years, she yearned to do something more creative, in the physical sense, with both her hands and mind. In 2000, she took this to heart and launched her professional faux finishing studio. Today, her favorite aspect is helping client’s re-imagine their spaces through stencils and finishes with great colors, patterns and textures on furniture, ceilings, and accessories.
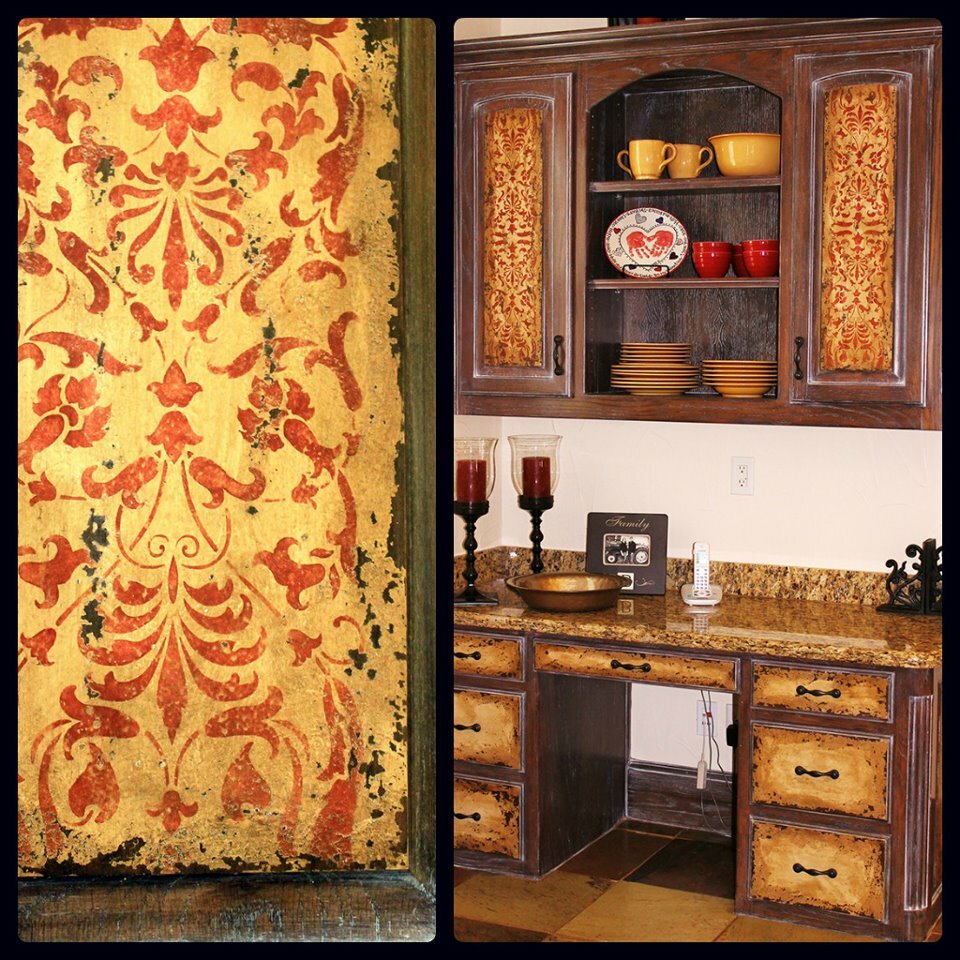
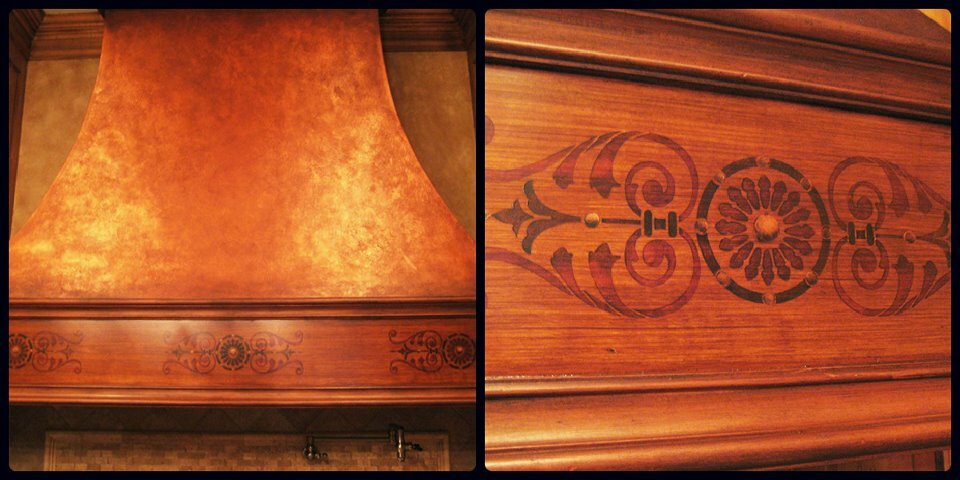
Above, a peeled paint and ceruse treatment by Amy incorporates our classic Ornate Italian Panel stencil. This is such an incredible finish for either furniture or cabinetry! Range and vent hoods are also a wonderful surface to transform with a stencil! Below, Amy created a faux hammered copper for the top, wood-grained the frieze. She then created a faux marquetry look with our Napoleon Panel stencil from our Modern Masters Designer Stencils Collection.
What draws you to Stenciling?
Stenciling enables me to incorporate a design element or pattern into my finish that is crisp, concise and consistent in a way that hand-painting alone doesn’t provide. The beauty of a stencil is that I can use it with just paint, or I can give it dimension with plaster, glass beads or even joint compound. I can further embellish it with gold leaf or foil as well as crystals and hand-painted details. It’s an excellent tool for anyone to give an otherwise run-of-the-mill finish that extra pizazz that makes it come alive.
Using individual elements from the Allover Corsini Damask wall stencil, Amy created a metallic drop-shadow technique. She then used glass beads through the stencil to add a wonderful shimmer. The walls received a beautiful pearl color wash prior to the stenciling for an allover shimmer.
How do you determine which pattern will work for your project?
I look at the space as a whole and envision how color, pattern and texture can enhance it as well as be combined in the same space. When I’m allowed to do pattern building and use more than one stencil and finish in a space I get really excited about the possibilities.
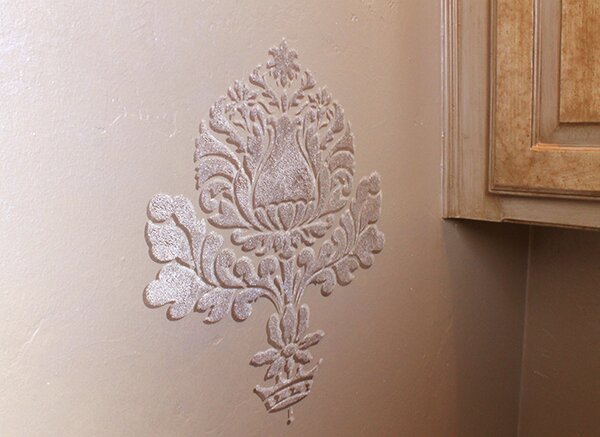
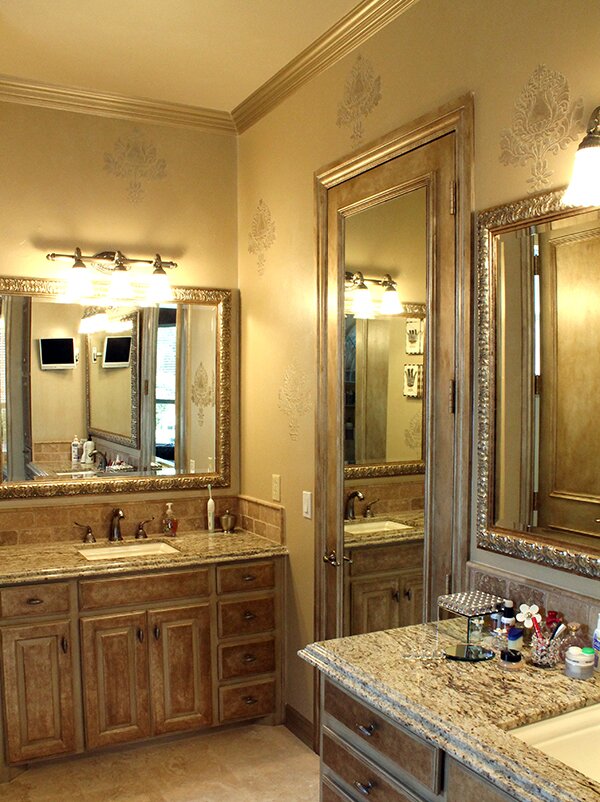
Plaster, gold leaf and bead accents are a beautiful touch with our Modello Ornamental Center OrnCen162, one of our most popular ceiling designs. Modello vinyl stencils are one-time use patterns that can be very helpful when working on ceilings or when larger size options are needed. Below, the bedroom walls and ceiling are two-color pearlized plaster. A Modello was used for both the ceiling fan medallion and the frieze design.
What would be your “dream” stencil project?
One of my favorite chateaus is Chenonceau in the Loire valley of France. It is filled with pattern and design on everything from elaborately handcarved wood work, to bas relief in stone, as well as beautifully stenciled and hand-painted walls and ceilings. No detail was left out in this castle! Even the windows are beautiful examples of pattern in both stained and leaded glass. It would be amazing to work on reproducing many of these beautiful designs and share them with the rest of the world in the form of a mylar stencil or Modello vinyl pattern.
The barrel vault ceiling above has a custom vinyl stencil from our Modello Ornamental Panels collection with an aged gold leaf treatment. Below: The Large Italian Medallion Border stencil helps a cabinet panel end piece (far right) pull in the overall design along while adding decided interest.
Beautiful work, Amy and thank you for sharing! You can see more of Amy’s artistry and projects on her website, Faux Get About It. Keep up with her decorative projects via Facebook and Twitter.
June 22nd, 2012
Stencil Star: David Hsueh
Our weekly series on Stencil Stars™ showcases our customer’s use of our Royal Design Studio mylar wall stencils and Modello™ masking stencils on walls, ceilings, floors, and more. This week, we go international to feature David Hsueh of Bella Vista Studio. David’s company is based in Shanghai, China and he and his team showcase classic design and wonderful artistry in their application of stenciled patterns in many of their decorative painting projects.

David Hsueh
ABOUT BELLA VISTA STUDIO
In 1987, David created Buildtec International Taiwan to start a decorative materials business. The major products he worked with were monocouche renders, a French product for facade decoration from Saint Gobain Weber. This business led him, in 2006, to lead a team for over a year that would see the completion of the faux finishing projects for both The Venetian Casino Resort and Ponte 16 Sofitel Resort in Macau. He started his faux and decorative finishing business from there by setting up Bella Vista Studio in Shanghai in 2007, which now focuses on high-end residential projects. He combined his experience and faux finishing classes from IDAL to create his unique business model and training programs for the China market. “I treat this business [like] a fashion business and use the restaurant model to extend it,” David explains.
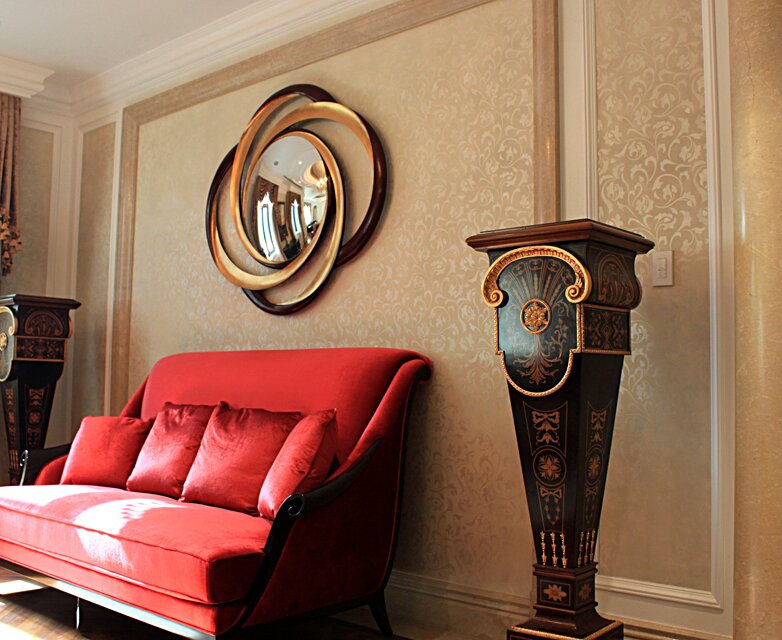
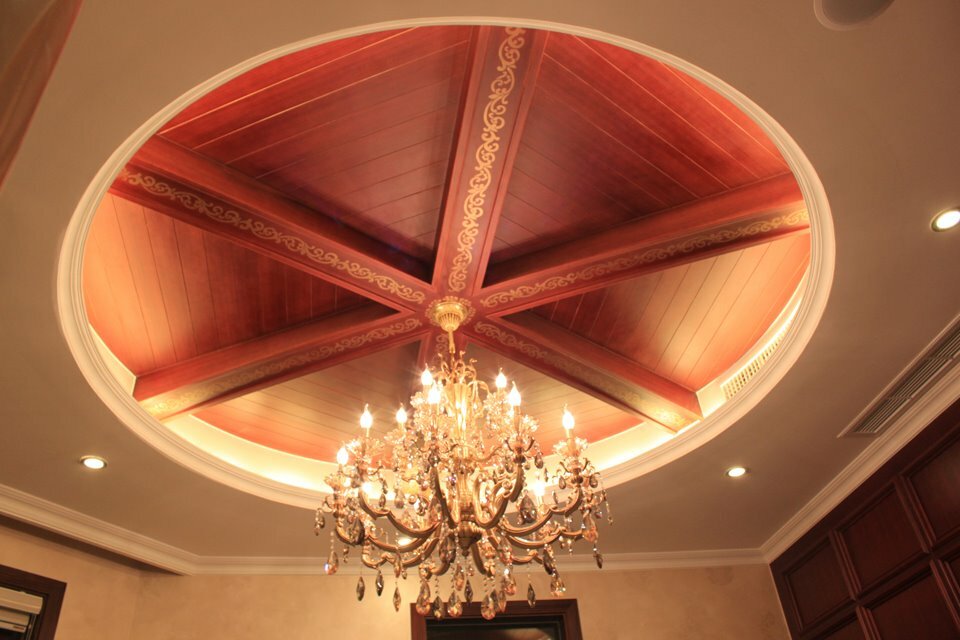
Above David used the Scrollallover stencil from our Allover Modern Collection in elegant tones for a formal living room. The wood beams in the circular ceiling below were stenciled with the Nintoh Border stencil.
David imports and distributes his preferred decorative finishing lines in China, and predominantly used Faux Effects decorative finishing mediums, metallic paints from Modern Masters and stencils from our line, Royal Design Studio.
David used a highly reflective, metallic plaster called Lusterstone and the Florentine Damask stencil to create the beautiful walls above.
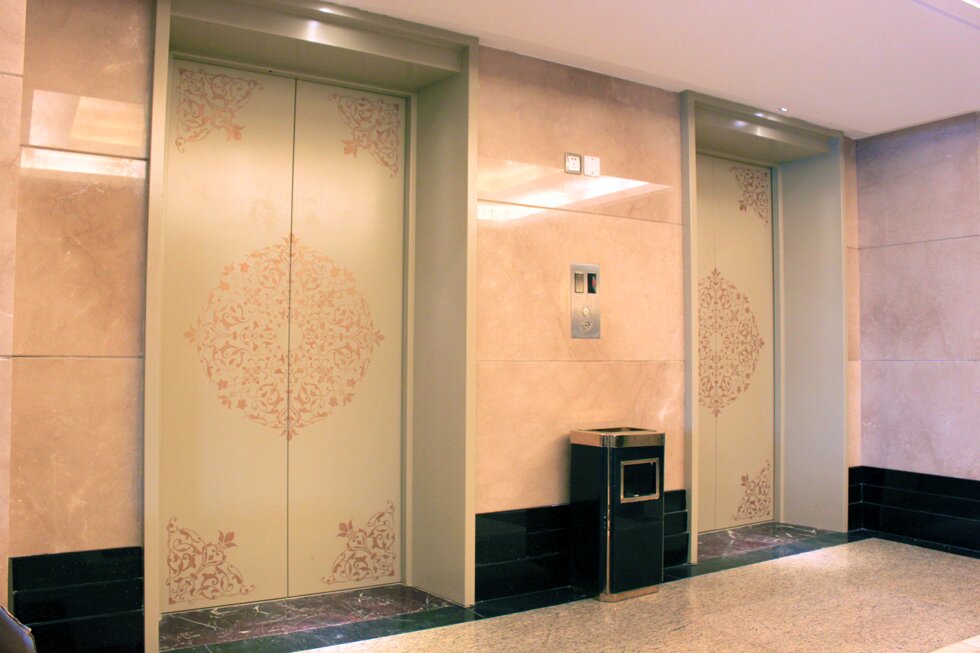
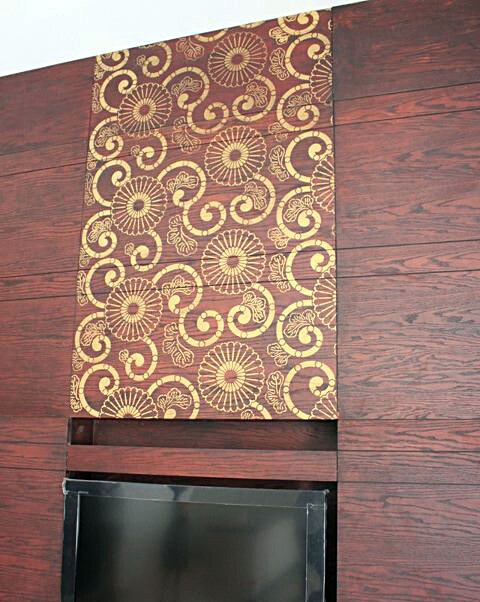
Elevators are a perfect surface for ornamentation! By using our Arabesque Ceiling Stencil Set on the doors instead of a ceiling, David created an unexpected and wonderful impact. Stencils are so versatile — and just a little can go a long way, as seen below. Using metallic gold through our Kyoto Allover from the Allover Japanese Stencil Collection helped complete the design of an entertainment center.
David explains, “To use a stencil is an easy and fast way to get perfect decorative effects”. He determines his patterns by the design style, the size of the stencil and how attractive the pattern is.
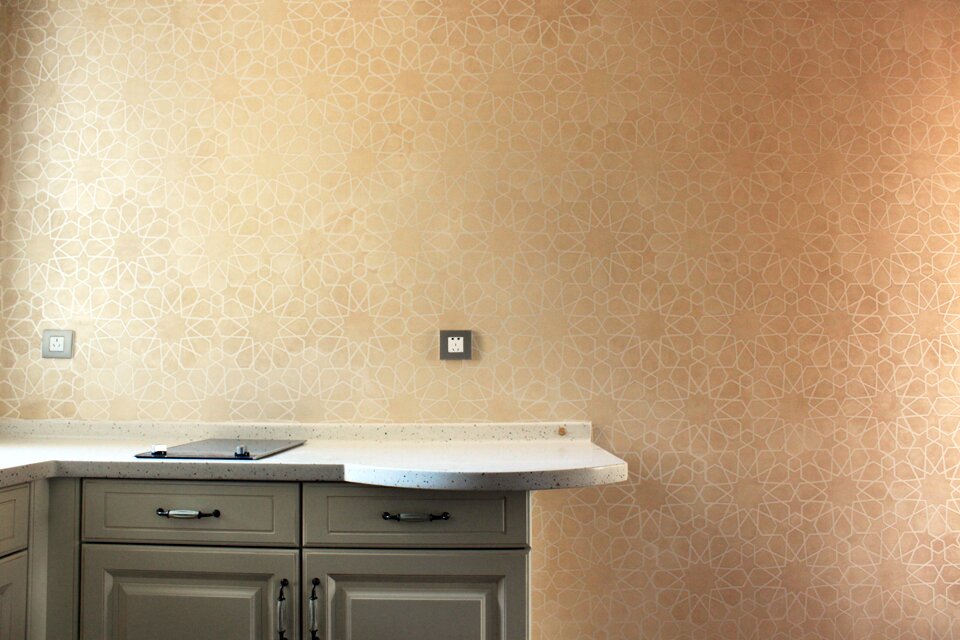
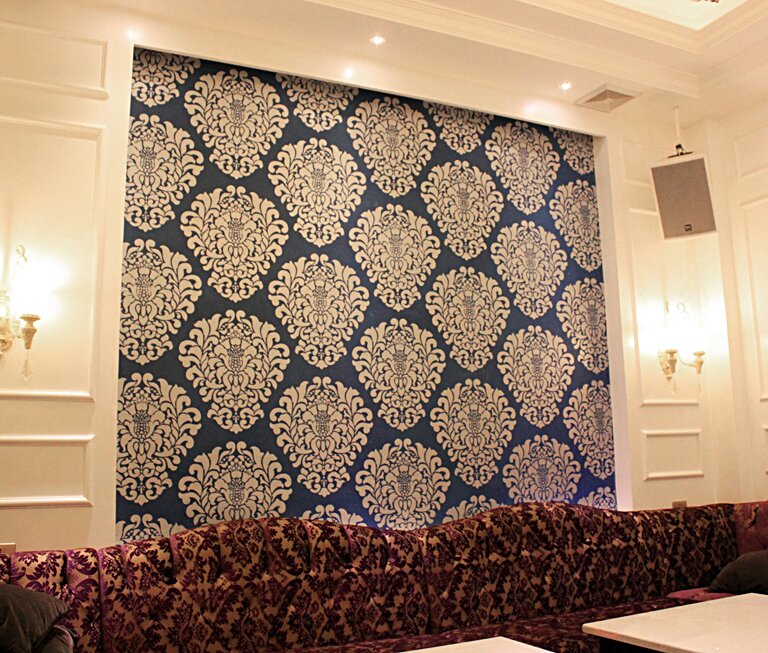
Neutral and yet so stunning — that’s our Moroccan Geometry stencil from the Moroccan Stencil series above. The striking blue and champagne focal wall below features our large-scale Grand Damask stencil as a dramatic feature in a hotel meeting room. The use of pattern and color here really helps to soften and define the space with style.
The bulk of David’s business comes from inspiration by a traditional standard. “My major business is hand-painted wallpaper effects. The use of stencils help us make perfect wallpaper effects in custom color and finishes, and also gives us successful results.”
 A stunning focal with the Chez Sheik stencil from our Allover Moroccan Stencil Collection.
Beauty needs no translation as we can see from David’s artistry! He is one of China’s most respected decorative artisans and it is a pleasure to see the Royal Design Studio patterns and designs brought to life in his capable hands. As a VERY appreciative admirer of the amazing range of incredible historical Chinese ornament I feel very humbled by the use of our classically-inspired stencil designs in this pattern rich culture. I personally have never had the opportunity to visit China, but find it very interesting that while we look East for exotic and historic inspiration, they seem to crave our Western design interpretations. It really is becoming a global village-at least as far as design is concerned! I hope you’ve enjoyed seeing David Hsueh’s wonderful artistry and stencil work,and are inspired to create more of your own. Please be sure to visit his website, Bella Vista Studio, or say hello to him on Facebook.
June 8th, 2012
Decorative & Faux Finishes
Our weekly series on Stencil Stars™ showcases our customer’s use of our Royal Design Studio mylar wall stencils and Modello™ masking stencils on walls, ceilings, floors, and more. This week, we feature Texas-based Cindy Howard and Dana DeBuck of Decorative & Faux Finishes, a super talented team of ladies who take the application of stenciled pattern to new heights in each and every one of their decorative painting projects.
Dana DeBuck and Cindy Howard
ABOUT DECORATIVE & FAUX FINISHES
Decorative & Faux Finishes, the decorative arts team of Cindy Howard and Dana DeBuck, has been in business since 1998. They create custom decorative finishes and murals for homeowners, designers, businesses and contractors in the greater Houston, Texas area and beyond. Both Dana and Cindy, along with their crew, exhibit incredible creativity and talent with a wonderful attention to detail. Today, we talk to them a bit about their wonderful attention to detail and get them to share their top stenciling tips.
 Gorgeous ceiling created with our vinyl Modello Center stencil OrnCen162b.
How do you determine which pattern will work for your project?
We listen to our customers. Our clientele represent all regions of the world and the designs chosen for each project must reflect their style, personality and culture. Royal Design Studio has the range of artistic work and the hi-tech ability to offer endless possibilities. If, for some reason, our job requires a stencil pattern other than the hundreds offered, we send a sketch and it becomes reality.
Pictured above is an entry foyer that was a double layer bird’s nest ceiling. It was stenciled with a Modello Ornamental Border (OrnBor172), metallic plaster and hand-painted drop shadows. Below, is our Modello Eastern Center stencil (EasCen107) nicely framing the light fixture with a coordinating border from our collection.
Please share your top Stenciling tip with us.
Read the directions first. Obvious advice, but so important! (Hint: When they say to use Gardz and burnish both sides of a Modello stencil, they mean it!)
Since we’ve been in business for 14 years, trial and error has been a constant teacher. Also, none of us know everything in this industry. With all the constant change in products, we should never feel too proud to ask for advice. In return, we strive to never be too competitive and to share ideas and the “What Not To-do’s” with other decorative artists to make all our lives easier.
Inspiring ideas for unique spaces! The focal arch above had a slightly customized Modello Ornamental Panel stencil (OrnPan162) while the ceiling below has a customized border stencil turned into a perfect matched circle by our design team.
What are your favorite surfaces to work on and design for?
Okay, we’re crazy, but our favorite surface to work on is the ceiling. Pain in the neck, measuring dilemmas, leveling challenges; but oh, so beautiful! The fifth wall calls to us, and we answer.
Ceilings with wonderful architectural details are perfect to incorporating a pattern! Above is our Modello Ornamental Center stencil (OrnCen170) in light colors, and below are customized borders atop a perfect metallic background. See the completed version here.
Their work is incredible with a perfectly finished quality to it that screams “professional”!! We so appreciate the opportunity to share their inspiring work with our stencils and products — thank you, Cindy and Dana! The beautiful executed and photographed images shared here are just a sampling of what this talented duo have to offer. Be sure to check out their website and Facebook fan page to keep in touch with them and regularly see more of their jaw-dropping projects.
Can’t wait for next week’s Stencil Stars?? We preview a little sampling of each weeks featured artists during Stencil Star Saturdays on our own Royal Design Studio Stencils/Modello Designs Facebook Page. Please stop by and say Hi and cheer our STARS on!
May 21st, 2012
Artisan Studio Design
Today begins a new weekly series on Stencil Stars™ where we showcase our customer’s use of our mylar wall stencils and Modello™ masking stencils on walls, ceilings, floors, and more. Each week we will feature a different decorative artist (or decorative studio!) whose work with our stencils excites and inspires us, with the hope that YOU will be inspired too! Look forward to interesting pattern combos and color palettes, pro painting tips and ideas, and even the stories behind the stenciling. I’ll be co-writing this series with a BIG assist from my friend Regina Garay of Fauxology and SociaComm fame. Regina is officially helping us with our creative outreach to artists and bloggers and is a great asset and ambassador!
Our inagural Stencil Stars are…. paint buds and business partners Brooke Johnson and Jann Krone of Artisan Studio Design

Brooke Johnson and Jann Krone
A Bit about Artisan Studio Design
A true passion for beautiful spaces led Texas-based Brooke and Jann out of *yawn* jobs in the corporate world into a creative one where both could fulfill their dreams and passion. They met at a seminar and became fast friends, then business partners, finding that by combining their respective talents they are able to offer their clients a much more comprehensive portfolio to choose from. Each has been extensively trained by Texturline of Canada, Safra from Italy, Faux Effects products, Modello Designs Stencils and Tattoowall, to name a few. Their passion, dreams and creativity can be seen in private residences, commercial buildings, corporate offices, design showcase events and numerous parade/dream homes. Collectively they have won various awards and have been interviewed both for radio, newspaper, magazines and books. Today we have a chance to delve into the details of their work and get some insights on their creative process.
![]()
The stunning, dramatic black & white bath above is created by using Modello Transitional Border Stencil 110
Brooke and Jann are accomplished using traditional stencils, like those we sell through Royal Design Studio. Most of the work featured here, however, focuses on their use of Modello Decorative Masking Stencils. These are one-time-use, adhesive backed vinyl stencils that allow for easy custom design and intricate, large-scale patterns. They have become the “go-to tool” for professional decorative finishers when pattern becomes a priority. Masking stencils offer many advantages. One of which is that the pattern can be worked using either the positive or negative image. We have capitalized on this by creating a collection of Transitional Border patterns, that allow you to “transition” from one color to another with the help of the pattern itself. Here are three prime examples of these in use by Artisan Studio Design.

An alternate use of this same Modello™ stencil pattern where Brooke and Jann provided perfect measurements so that our custom design department could fit the pattern to a tee by manipulating the design elements slightly so that each corner is beautifully finished.

A different Transitional border stencil, 113, was used to create a two-tone stencil effect in a bathroom higher up on the wall.
The beautiful groin ceiling above was done with a Royal Design Studio custom stencil to Artisan Studio Design’s specifications. It really enhances and accentuates the area while balancing out the color scheme.
Now, some questions for Artisan Design Studio…..
What draws you to Stenciling?
The ability to create without limitations. Using traditional mylar stencils and Modello custom masking stencils allow us the ability to enhance ANY surface. We have used them on concrete floors, walls, furniture, niches, cabinets, crown moldings, ceilings and mirrors. Our mediums have included paint, plaster, glass beads and concrete. The impact even using a small stencil image can make the difference between a nice finish and an extraordinary finish.
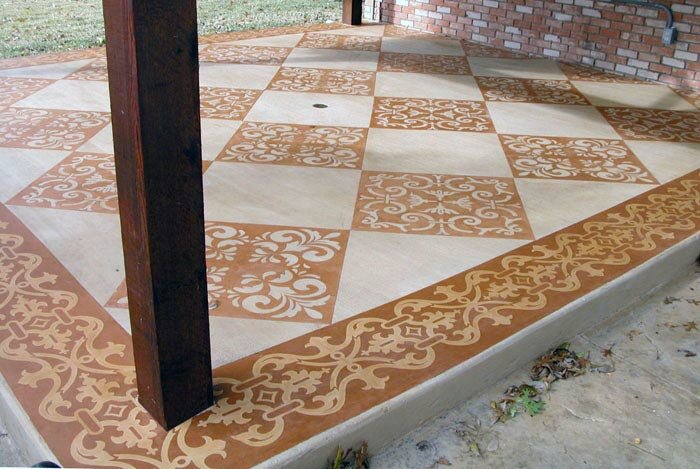
A patio floor is transformed from blah to wow! using a well-designed pattern and warm colors.
How do you determine which pattern will work for your project?
We love this question! One of our requirements in designing for any client is that we must visit the space where we will be creating a design. We feel the areas that we create should evoke a feeling of well-being and reflect our client’s personality and wishes. To achieve that goal we spend time with our clients, asking questions, reviewing the architecture and discussing the purpose of the space so we have a clear picture of what needs to be accomplished. To do that, you have to come to know your client well. Every client is different, so we approach every project with an open mind taking into account the clients requests and desires.
In getting to know our client, we have found that certain personalities such as accountants, architects, doctors and professional athletes tend to go for a more of a grid format, whether they realize it or not. Professions that aren’t as structured tend to prefer a looser, more free-flowing pattern such as more random placement and more eclectic. It is the ability to read people and their spaces that has given us an advantage in picking patterns and how they are laid out and the client isn’t any wiser. They just like the fact that it “works” and is perfect for them.
Jann and Brooke at work on a very large ceiling stencil project that required some serious custom designing to fit the “boat” shaped recessed area. The end result (below) showcases the finished customized Modello Chateau Carpet Panel — which translates beautifully to ceilings as well as floors!
Please share your top stenciling tips with us.
When working on a light or white background, we use the low-tack gray Modello™ masking material. This is especially useful when you are hand-painting your design. When using Modello™ stencil patterns or mylar stencils, you can never measure too many times, especially on groin vaults. We have found that there is NO such thing as a perfectly straight or square room and no two sides are ever exactly the same measurement. Measure, measure and measure again.
We had a situation in a powder bath that had an arched wall that separated the sink from the toilet area. The pattern the designer requested was a trellis pattern. The challenge for us was to have the pattern on the forward wall of the arch MATCH the pattern on the back wall when you walked in, so there was no break in the visual effect. This was a prime example of measuring the area and matching it to the size of the stencil we needed.
Another tip is to always buy more then one stencil or purchase a small stencil that matches the production size stencil. We have found these extra stencils come in handy especially if you have to cut them up to make your design work. Last, we always have a large pad of newsprint when we are stenciling. It is an inexpensive pad from any hobby store that we can quickly wipe down, clean our stencils on and throw away the used paper. The newsprint also comes in handy when we need to spray adhesive on the stencils. We always keep a spray bottle of Simple Green with us to wipe down the stencils, too.
Architectural elements such as inset niches and ceilings can become wonderful focal points. This ceiling features Modello Ornamental Center 128.
We hope you’ve enjoyed seeing the work of our first Stencil Stars! We’re so happy that Brooke and Jann have found the perfect partnership in each other and incorporating pattern into their many projects. We have SO MANY fabulously talented customers, you can rest assured that we have many more posts on the way. Special note: You can see a preview of each week’s Stencil Star each Saturday on our Royal Design Studio/Modello Designs Facebook Page. You can find more of Brooke and Jann’s work on their website, Artisan Design Studio and their Facebook page.
April 9th, 2012
Stencil Amour Pinterest Contest
I pin. You pin. We all pin for a stencil win! I know that many of you are already BIG Pinterest fans (like me!), as well as Royal Design Studio stencil fans. SO…..we are so pleased to announce our first Pinterest pinning contest, Stencil Amour. This is your chance to pin all those stencils you’ve been coveting in one place and possibly WIN a $250 Shopping Spree.

We’ve set up the contest rules and commenting to enter on our new Stencil Ideas Blog on our stencil website. Go to the post there to see the easy rules for entry and start pinning your fav Royal Design Studio stencils to your own Royal Design Stencils Love Pinterest board. Then, keep your fingers crossed that you will be the lucky winner of a super $250 stencil shopping spree. Don’t forget to enter the contest by commenting on the post on Royal Design Studio. Good luck to all you pin-happy people!!
April 3rd, 2012
Fab Furniture Stenciling
It seems like everyone is painting and stenciling furniture these days. And why not? Furniture makes a great little canvas for stencil patterns and you can accent details like table tops, drawer fronts, door panels SO easily and quickly with stencils. The availability and popularity of the the amazing Annie Sloan Chalk Paint™ is inspiring people all over the country to scour thrift stores and flea markets for furniture pieces that can be transformed in a day with some creativity and a can of paint!

One of my friends who has caught the furniture painting bug bad good, is Debbie Hayes of Faux Design Studio. Debbie is a long-time decorative artist who has the MOST amazing studio in a converted fabric mill in Greensboro, NC. There she paints endlessly (it seems!), sells her one-of-a-kind furniture pieces and also teaches others how to do the same. Debbie has such an artful approach to using Chalk Paint™ and stencil patterns we were inspired to create this lovely graphic to showcase her work.
You can find all the details about the Royal Design Studio stencils and Chalk Paint colors Debbie used in this Fabulous Furniture Stencil post on our website. I hope it inspires YOU!
April 1st, 2012
Skimstone How-To Videos
Some time ago, I offered a Sneak Peek at a new Virtual Workshop I was working on with Katrina Johnson of SkimStone: Mastering Modello Patterns and SkimStone Surfaces. I had hoped to have this new online workshop ready this past Fall, but obviously THAT didn’t happen.


Well, happy to say we are in the final stages of getting that ready to launch. In case you are wondering, Virtual Workshops is an idea I came up with a few years ago when the crappy economy started preventing people from having the time and money to travel to my San Diego studio for classes. These workshops are web-based, and featured extensive, detailed, pre-recorded video lessons, printed materials, and a one-time live webinar for review and Q&A. We are currently revamping our Virtual Workshop website, so that our previous VW’s Patterned Mirror and Glass, Foilin Around, and Stencil Impressions will be available again SOON! First things first, though-introducing Mastering Modello Patterns and SkimStone Surfaces.
Katrina and I have create a free intro series of SkimStone 5 how-to videos to introduce you to the basics of using SkimStone and Modello masking stencils. This video is Part 1. Please visit our How-to Videos page on Paint and Create to see the rest! These will give you a good foundation on how to use SkimStone, but if they leave you wanting MORE, and we hope that they do, we invite you to sign up for our Virtual Workshop mailing list for the possibility to win a FREE PASS to this upcoming Virtual Workshop and also to receive a special discount code to use when the full workshop becomes available mid-April. We will be giving away workshop passes to 5 lucky winners. Sign up to win at the bottom of this page.
We’ve created a gallery of lovely SkimStone and Modello pattern applications to inspire you. Have a look and hope you’re a winner!


 Copyright © Designamour