January 22nd, 2013
Stencil Star: Kathy Wear
Our customers are ALWAYS finding new and creative ways to combine decorative paint techniques with ornamental patterns and stencil designs on unique surfaces. We like to applaud these innovative artists in our Stencil Star™ series, which seeks to showcase creative artists worldwide and their inspired work. Today we feature the fun and lively Kathy Wear of Artistic Finishes in Tennessee!

ABOUT KATHY WEAR
Kathy Wear is the owner of Artistic Finishes in Tennessee. Artistic Finishes specializes in custom wall finishes and hand troweled plasters as well as murals and decorative concrete. Kathy has won numerous awards over the last 10 years including six awards for Best Faux Finish from the Middle Tennessee Builders Association for her work in the Parade of Homes. She was recently named one of the top three decorative concrete artists in Nashville. Her work has also been published in many local and national publications and also been featured on Southern Homes and Lifestyles TV.

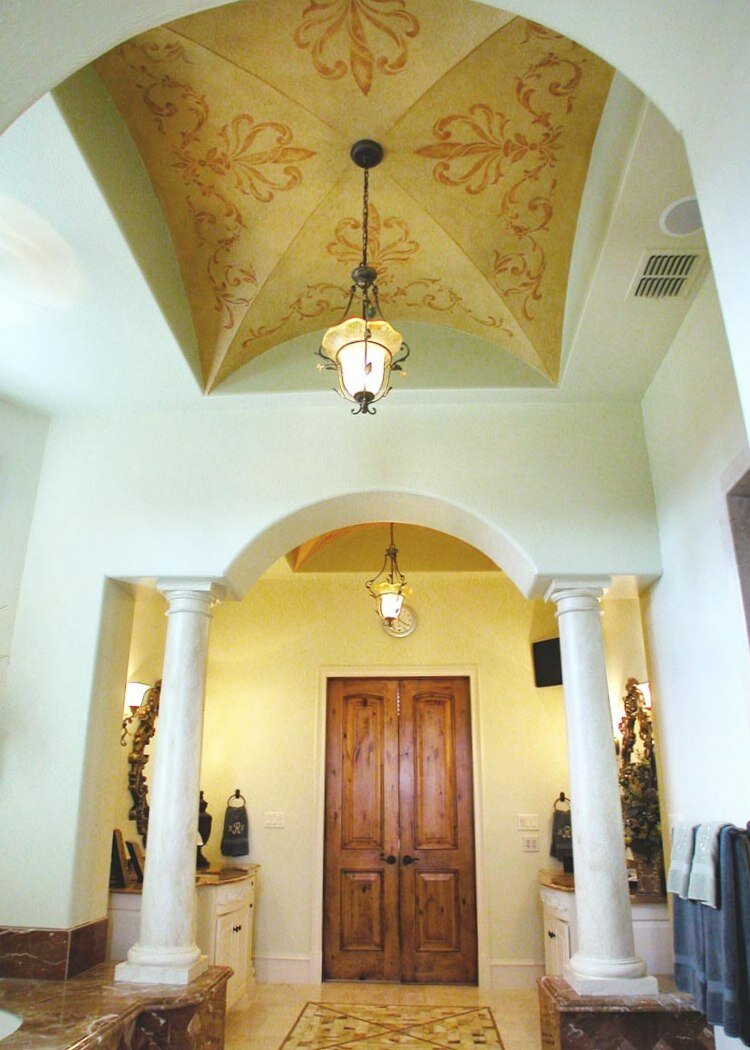
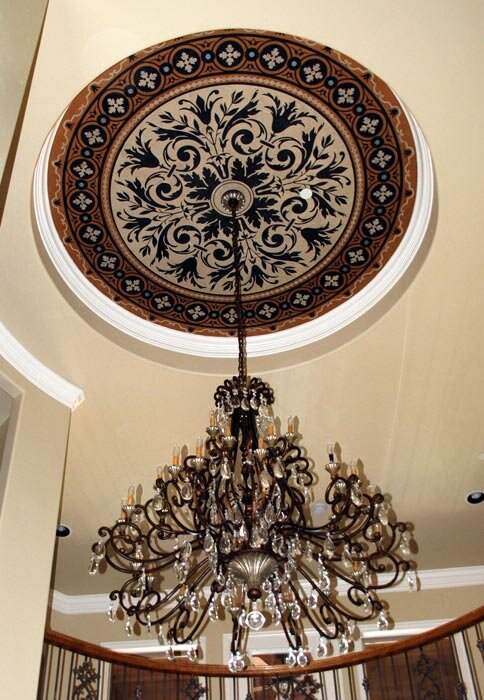
Fabulous ceiling she stenciled with a custom Modello™ Designs stencil pattern and a great color scheme!
What draws you to Stenciling?
I am drawn to stenciling because I can really customize the work I do for my clients as I try to never do the same finish twice. My clients love the fact that they have something unique to their home. Over the past few years I have done many stenciled ceilings and more recently I have done quite a few floors. Doing a stenciled ceiling or floor can add a very dramatic focal point to a room and turn a plain space into something fabulous.

Kathy creates Custom Commodes™ for her clients which use metallic foils and leaf combined with our Modello™ Designs vinyl stencils!
How does Stenciling enhance your creative business?
What I love about stenciling and using Modello® Designs masking stencils is that I can talk with my clients and designers and get a sense of what they are looking for in the space and then create a drawing and send it to the Modello team. They customize it into a beautiful work of art and I use this to create exactly what my client wants. The last floor project I completed was a joy to work on! I worked with Melissa at Modello Designs to do a large custom border stencil on a very irregular shaped alter floor and it fit like a dream.

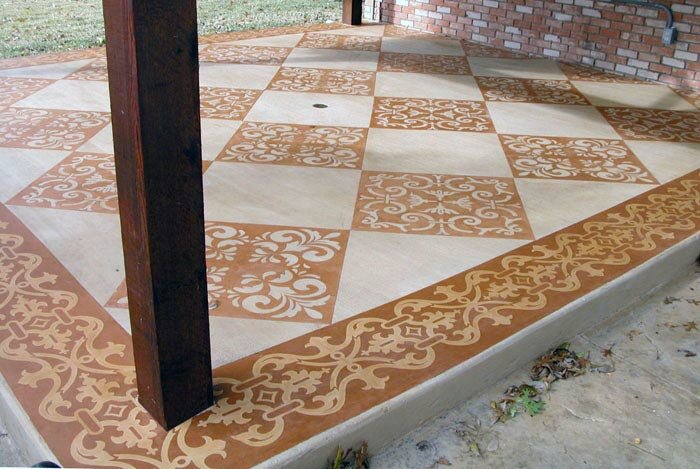
This stunning faux marble floor was created with a concrete overlay, one of our Modello™ Designs Ornamental Tile vinyl stencil designs (OrnTil180) for the large center element and additional custom designs.
Please share your top Stenciling Tips with us.
My top tips for stenciling are, number one DON’T be intimidated!! It is not hard to do. Once you get in the swing of things it progresses very quickly. If you are using a Modello® Designs masking stencil, be sure to have you measurements correct. If you get these right, your stencil should lay down quite easily. Any small gaps or errors that may occur can quickly be corrected by a bit of blue tape. If I don’t personally prepare my substrate, I always roll on a quick coat of Guardz as this way I can be assured that the stencil will pull off quickly and cleanly. A second pair of hands and eyes is always helpful when laying the stencil. So, try it! My favorite part of all is when I pull the stencil and reveal the beautiful design!

Kathy is no stranger to glam, custom works! You can see her unique treatment above with an Ornamental Stencil border (OrnBor125) around a niche and below with a canvas created with a Modello™ Designs vinyl motif stencil from our Art Deco Collection (DecMot120).

We hope you’ve enjoyed seeing Kathy’s beautiful work and inspiring creativity with both our Royal Design Studio stencils and Modello® Designs masking patterns! You can find more of her work in her Artistic Finishes website! If you’d like continued inspiration, don’t forget to visit our Pinterest boards filled with design, pattern and finish ideas and our Facebook fan page for stencil projects and more!
December 26th, 2012
Contemporary Columns
When I created Modello® Designs back in 2003, my goal was to offer an alternate to our Royal Design Studio traditional mylar stencils for applying customized pattern for both the decorative finishing and design communities. The introduction of these one-time-use vinyl stencils would allow for projects to become more time effective and yet deliver an extraordinary amount of design detail, and offer pattern application to almost any surface. Since then, I’ve enjoyed seeing gorgeous artistry from artists around the world, but I do have to say that I really pleased to see this stenciled columns project by Suzanne Pratt of Toronto’s Venetian Studios. It got rave reviews when we posted it on our Facebook Page, so thought it would be great to share more pics and go into a little more detail here~

Suzanne worked closely with James in our graphic design department to design a pattern that nicely wrapped the large concrete columns to create an uninterrupted design. Of course, the flexibility and adhesive quality of the Modello® vinyl made for a super easy pattern installation!

The pattern was a custom-made design for Suzanne’s commercial client, Spot Coffee. Suzanne used a coffee-colored plaster finish to enhance the pattern on the concrete columns. Hmmm, wonder where they got their color idea from??


Isn’t this a fantastic and inspired idea for a unique column finish? Suzanne did a beautiful job of creating an eye-catching and unforgettable surface that warms up this space like a cup of coffee warms my tummy. Please be sure to visit her Venetian Studios website and check out her Facebook business page. Don’t forget to pin and share Suzanne’s lovely work as well! Like I said above, it was one of the most popular shares EVER in our Royal Design Studio Facebook fan page.
Even if you don’t have columns to decorate, you can get TONS of ideas for how to use our Modello® masking stencils on all sorts of surfaces. We published 2 volumes of books of our customer images called Modello by Design. Volume 1 is now almost sold out (so, yeah, you should hurry), Modello by Design,Volume 2 is equally awesome (so, yeah, get both ![]() ).
).
If you’d like more visual inspiration for more traditional stencil designs and decorating, please visit our Pinterest boards and consider becoming a part of our artistic community boards where tons of great visuals are shared daily! We also have creative project features in our Stencil Ideas blog which showcase our stencil collections and designs. Happy painting!
August 23rd, 2012
Stencil Stars: Bella Tucker
Hey Y’all! Are you ready for another Stencil Star showcase? We visit Nashville this week to meet with Dana & Brooks Tucker of Bella Tucker Decorative Finishes. Dana & Brooks are a husband and wife team that are perfectly matched — he oversees the projects and she runs the marketing and management of the business. It’s this teamwork that translates beautifully to the creation of outstanding decorative painting projects and inspired applications of stencil design and patterns.

Dana & Brooks Tucker
ABOUT BELLA TUCKER
Bella Tucker Decorative Finishes is based just outside of Nashville in Franklin, TN. It is a collaborative partnership of husband and wife team, Brooks (artist) and Dana Tucker. Brooks is a 6th generation Texan who was born into a Navy family. He has lived all over the world including two moves to Italy. It was in Europe that he developed a love of texture, color and decorative paint treatments. In 1997, he moved to Nashville with Dana, and after seeing the incredible finishes they were creating for their own home, family and friends starting requesting Brooks to paint for them as well. They launched their business in 2006 and since then, have received many accolades as well as being chosen for a feature in the Nashville Southern Living Showcase Home.

The Chez Sheik stencil from the Allover Moroccan Collection makes a gorgeous impression when walking into the powder bath (above). Our easy to use Smoked Oyster Stencil Creme was chosen to stencil the pattern with a lustrous sheen.
What draws you to Stenciling?
We were initially drawn to stenciling as a way to modernize our portfolio and stay on-point with design trends. We were getting a lot of feedback from designers that no one was asking for faux finishes any more. Once we could show them modern applications of faux finishes using graphic stencil patterns, the tide turned. Now, we keep a pretty full pipeline of projects with a lot of designers and clients requesting stencils.

Our Contempo Wall Trellis stencil is a relatively new pattern in our Allover Modern Collection and used within a wonderful neutral scheme above. The interior design is by Julie Couch Interiors and the photo is courtesy of photographer Caroline Allison.
How do you determine which pattern will work for your project?
Pattern is so personal. It really takes walking through a client’s space and getting a feel for their style. What helps us narrow down pattern more than anything is Pinterest. I always keep active boards and I ask my clients to either send me photos of patterns they like, or comment on the Bella Tucker Pinterest account. Royal Design Studio has an amazing website, too. My clients love to get on there and spend hours looking at the stencil design options.

Bella Tucker uses great stencil patterns for ceilings to flooring and every surface in between! Our Skylar’s Lace Floral stencil was chosen by designer Julie Couch and is perfectly paired with the beautiful light fixture above. Photo by Caroline Allison. A custom Ikat Chevron Modello™ Designs vinyl stencil pattern is used with the Skimstone concrete floor below. The beautiful exterior patio was part of the Nashville Southern Living Showcase Home.

How does Stenciling enhance your creative business?
We were originally drawn to stenciling because we are always try to stay on top of current design trends. We were seeing a lot of graphic patterns in the shelter magazines and we knew that we could work with that concept but extend it to be more artistic and one of a kind while completely customizing the color, texture and pattern for each specific project.

Dana & Brooks had a fun personal project with a re-purposed vintage headboard, above. They made a “welcome” sign for their front porch using our Chevron Furniture stencil and Annie Sloan Chalk Paint™. Below, a photo by Caroline Allison shows our Uzbek Suzani stencil gracefully enhancing a guest bedroom. Designer Julie Couch worked with Bella Tucker to create a beautiful and serene guest bedroom.

Dana and Brooks are an engaging couple and a GREAT team! We love how each design here is done in an neutral palette, but with a fresh, fun twist that makes their finishes anything but boring. We appreciate their sharing their stencil thoughts with us! Keep up with Bella Tucker by visiting their their website, Bella Tucker Decorative Finishes, and watch their Facebook page for frequent project updates.
Don’t miss a pretty pattern opportunity!! Be sure to follow us on Facebook AND follow us on Pinterest to receive the fresh and creative inspirations and projects we share daily! Don’t forget to pin these wonderful images too-BIG hint!
Our weekly series on Stencil Stars™ showcases our customer’s use of our Royal Design Studio mylar wall stencils and Modello™ masking stencils on walls, ceilings, floors, and more.
May 21st, 2012
Artisan Studio Design
Today begins a new weekly series on Stencil Stars™ where we showcase our customer’s use of our mylar wall stencils and Modello™ masking stencils on walls, ceilings, floors, and more. Each week we will feature a different decorative artist (or decorative studio!) whose work with our stencils excites and inspires us, with the hope that YOU will be inspired too! Look forward to interesting pattern combos and color palettes, pro painting tips and ideas, and even the stories behind the stenciling. I’ll be co-writing this series with a BIG assist from my friend Regina Garay of Fauxology and SociaComm fame. Regina is officially helping us with our creative outreach to artists and bloggers and is a great asset and ambassador!
Our inagural Stencil Stars are…. paint buds and business partners Brooke Johnson and Jann Krone of Artisan Studio Design

Brooke Johnson and Jann Krone
A Bit about Artisan Studio Design
A true passion for beautiful spaces led Texas-based Brooke and Jann out of *yawn* jobs in the corporate world into a creative one where both could fulfill their dreams and passion. They met at a seminar and became fast friends, then business partners, finding that by combining their respective talents they are able to offer their clients a much more comprehensive portfolio to choose from. Each has been extensively trained by Texturline of Canada, Safra from Italy, Faux Effects products, Modello Designs Stencils and Tattoowall, to name a few. Their passion, dreams and creativity can be seen in private residences, commercial buildings, corporate offices, design showcase events and numerous parade/dream homes. Collectively they have won various awards and have been interviewed both for radio, newspaper, magazines and books. Today we have a chance to delve into the details of their work and get some insights on their creative process.
![]()
The stunning, dramatic black & white bath above is created by using Modello Transitional Border Stencil 110
Brooke and Jann are accomplished using traditional stencils, like those we sell through Royal Design Studio. Most of the work featured here, however, focuses on their use of Modello Decorative Masking Stencils. These are one-time-use, adhesive backed vinyl stencils that allow for easy custom design and intricate, large-scale patterns. They have become the “go-to tool” for professional decorative finishers when pattern becomes a priority. Masking stencils offer many advantages. One of which is that the pattern can be worked using either the positive or negative image. We have capitalized on this by creating a collection of Transitional Border patterns, that allow you to “transition” from one color to another with the help of the pattern itself. Here are three prime examples of these in use by Artisan Studio Design.

An alternate use of this same Modello™ stencil pattern where Brooke and Jann provided perfect measurements so that our custom design department could fit the pattern to a tee by manipulating the design elements slightly so that each corner is beautifully finished.

A different Transitional border stencil, 113, was used to create a two-tone stencil effect in a bathroom higher up on the wall.
The beautiful groin ceiling above was done with a Royal Design Studio custom stencil to Artisan Studio Design’s specifications. It really enhances and accentuates the area while balancing out the color scheme.
Now, some questions for Artisan Design Studio…..
What draws you to Stenciling?
The ability to create without limitations. Using traditional mylar stencils and Modello custom masking stencils allow us the ability to enhance ANY surface. We have used them on concrete floors, walls, furniture, niches, cabinets, crown moldings, ceilings and mirrors. Our mediums have included paint, plaster, glass beads and concrete. The impact even using a small stencil image can make the difference between a nice finish and an extraordinary finish.
A patio floor is transformed from blah to wow! using a well-designed pattern and warm colors.
How do you determine which pattern will work for your project?
We love this question! One of our requirements in designing for any client is that we must visit the space where we will be creating a design. We feel the areas that we create should evoke a feeling of well-being and reflect our client’s personality and wishes. To achieve that goal we spend time with our clients, asking questions, reviewing the architecture and discussing the purpose of the space so we have a clear picture of what needs to be accomplished. To do that, you have to come to know your client well. Every client is different, so we approach every project with an open mind taking into account the clients requests and desires.
In getting to know our client, we have found that certain personalities such as accountants, architects, doctors and professional athletes tend to go for a more of a grid format, whether they realize it or not. Professions that aren’t as structured tend to prefer a looser, more free-flowing pattern such as more random placement and more eclectic. It is the ability to read people and their spaces that has given us an advantage in picking patterns and how they are laid out and the client isn’t any wiser. They just like the fact that it “works” and is perfect for them.
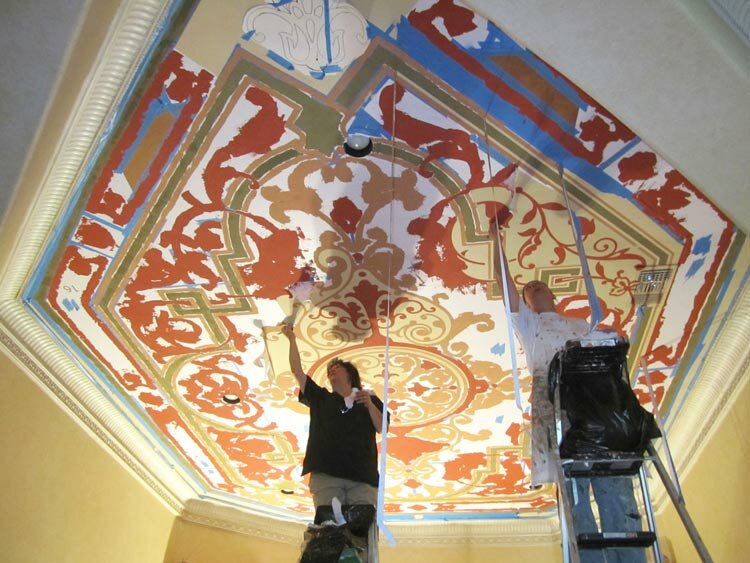
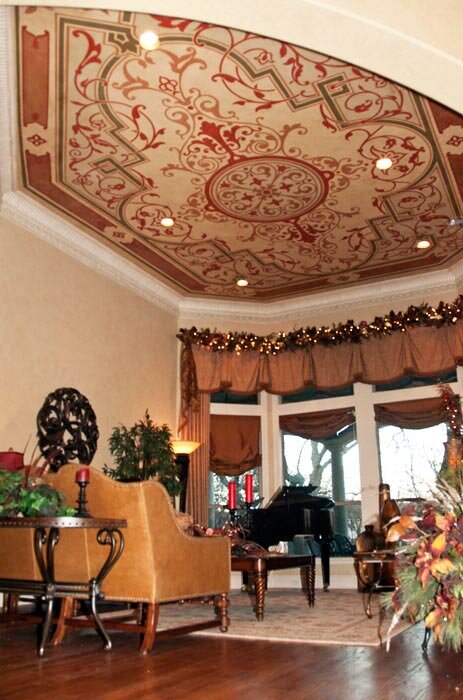
Jann and Brooke at work on a very large ceiling stencil project that required some serious custom designing to fit the “boat” shaped recessed area. The end result (below) showcases the finished customized Modello Chateau Carpet Panel — which translates beautifully to ceilings as well as floors!
Please share your top stenciling tips with us.
When working on a light or white background, we use the low-tack gray Modello™ masking material. This is especially useful when you are hand-painting your design. When using Modello™ stencil patterns or mylar stencils, you can never measure too many times, especially on groin vaults. We have found that there is NO such thing as a perfectly straight or square room and no two sides are ever exactly the same measurement. Measure, measure and measure again.
We had a situation in a powder bath that had an arched wall that separated the sink from the toilet area. The pattern the designer requested was a trellis pattern. The challenge for us was to have the pattern on the forward wall of the arch MATCH the pattern on the back wall when you walked in, so there was no break in the visual effect. This was a prime example of measuring the area and matching it to the size of the stencil we needed.
Another tip is to always buy more then one stencil or purchase a small stencil that matches the production size stencil. We have found these extra stencils come in handy especially if you have to cut them up to make your design work. Last, we always have a large pad of newsprint when we are stenciling. It is an inexpensive pad from any hobby store that we can quickly wipe down, clean our stencils on and throw away the used paper. The newsprint also comes in handy when we need to spray adhesive on the stencils. We always keep a spray bottle of Simple Green with us to wipe down the stencils, too.
Architectural elements such as inset niches and ceilings can become wonderful focal points. This ceiling features Modello Ornamental Center 128.
We hope you’ve enjoyed seeing the work of our first Stencil Stars! We’re so happy that Brooke and Jann have found the perfect partnership in each other and incorporating pattern into their many projects. We have SO MANY fabulously talented customers, you can rest assured that we have many more posts on the way. Special note: You can see a preview of each week’s Stencil Star each Saturday on our Royal Design Studio/Modello Designs Facebook Page. You can find more of Brooke and Jann’s work on their website, Artisan Design Studio and their Facebook page.
April 1st, 2012
Skimstone How-To Videos
Some time ago, I offered a Sneak Peek at a new Virtual Workshop I was working on with Katrina Johnson of SkimStone: Mastering Modello Patterns and SkimStone Surfaces. I had hoped to have this new online workshop ready this past Fall, but obviously THAT didn’t happen.


Well, happy to say we are in the final stages of getting that ready to launch. In case you are wondering, Virtual Workshops is an idea I came up with a few years ago when the crappy economy started preventing people from having the time and money to travel to my San Diego studio for classes. These workshops are web-based, and featured extensive, detailed, pre-recorded video lessons, printed materials, and a one-time live webinar for review and Q&A. We are currently revamping our Virtual Workshop website, so that our previous VW’s Patterned Mirror and Glass, Foilin Around, and Stencil Impressions will be available again SOON! First things first, though-introducing Mastering Modello Patterns and SkimStone Surfaces.
Katrina and I have create a free intro series of SkimStone 5 how-to videos to introduce you to the basics of using SkimStone and Modello masking stencils. This video is Part 1. Please visit our How-to Videos page on Paint and Create to see the rest! These will give you a good foundation on how to use SkimStone, but if they leave you wanting MORE, and we hope that they do, we invite you to sign up for our Virtual Workshop mailing list for the possibility to win a FREE PASS to this upcoming Virtual Workshop and also to receive a special discount code to use when the full workshop becomes available mid-April. We will be giving away workshop passes to 5 lucky winners. Sign up to win at the bottom of this page.
We’ve created a gallery of lovely SkimStone and Modello pattern applications to inspire you. Have a look and hope you’re a winner!
June 1st, 2011
Marrakech-The Encore Trip!
Every year for the last 3 years I have had the great fortune to lead a different group of “Peacock Painters” on an amazing journey of art, culture, and discovery to one of my favorite places in the world: Marrakech. Each trip has been unique in the projects that we have done with Maryam (of My Marrakesh) at the increasingly lovely Peacock Pavilions. On our first trip in 2008, this chic boutique hotel was still a major construction site, but we were able to stencil some amazing graphic ceilings and henna-inspired stair risers. In 2009, we returned as Maryam and her family had just moved in to the main house there-with much work still to be done. This trip featured stenciled floors, more stair risers, and a dramatic, Art Deco-inspired mural. In 2010, we inaugurated the hotel as its first guests while we stenciled a beautiful entertainment tent there. As many projects as we have done to floors, walls, ceilings, fabric and stair risers, there are still spaces that are calling for an artistic touch.

And so, I am happy to announce that in October 2011, we will return to make more magic and more memories! And the memories ARE magical. In order to prepare for planning this upcoming trip, I spent a couple of days reliving our past journeys. Each person, each group, each project lives happily in my heart. I wanted to honor that with a special video that (I hope) captures the mystique and the joy that these trips have brought to me and all who have joined me….
Would you like to join me in Marrakech as well?? You can find more trip information here, and download a pdf with all the juicy details here. Space is limited, so don’t delay, OK? See you in Morocco!!

April 15th, 2011
The Art of Procrastination
Today being “tax day”, April 15th, they ran a story on the news last night pointing out that a full 25% of Americans put off filing until the last two weeks before the deadline. I’m guessing THOSE are the people who aren’t expecting refunds?! Anyhoo, it prompted me to come clean on a character trait I have that I am none to proud of: I am a serial procrastinator. This fact is all to evident in my own house (and lack of regular blog posts), where the wheels of decorating grind slowly and projects get get pushed off for years. As in, MANY years. Gulp.

It’s been 4 years now (she writes incredulously-where DID that time go??), since I wrote this post about redoing my home office. I actually dismantled the room shortly after writing that post, and it’s been living in “no man’s land” ever since.

Back then, I was SERIOUSLY into Japanese decoration. Actually I still am, but the problem is, I am seriously into lots of OTHER decorating themes as well. That seems to be the problem. I have been back and forth, up and down, and even sideways trying to settle my mind on something that I will want to live with-and so, I’ve done nothing. Brilliant, huh? Until now…
I have loosely settled on a boho/contempo/Moroccan/upcycled/glam theme. Actually, that’s not a theme at all and obviously my brain is still crankin. But while my brain takes its time getting it’s thoughts together, I have at least started something. I am decidedly NOT a linear thinker, and take an “organic” approach to design. What that really means is that I figure it out as I go along. The main thing is to GET STARTED, and I am starting with the floor.

On my trips to Morocco, I have always been drawn to the zigzag zellij tile patterns on the floors-usually done in black in white or green and white. I was also inspired by Maryam’s kitchen floor tiles. I love the dusty look of concrete tiles and SkimStone is the perfect medium to give me that.

So, I came up with this sample, and havc the floor all ready prepped with the creamy white layer of SkimStone. Note: to get here, I removed the existing carpet from the concrete slab and spent some time removing the excess glue and scrubbing the heck out of it to get it super clean.

It’s going “down” this weekend, with the help of a custom-fit, Modello masking stencil, and here how it all lays out. It’s a smallish room (11′ square, more or less) and the stripes will definitely help to enlarge is visually. I will be adding an area rug at some point, but I really wanted a “neutral” but zingy (or should I say ziggy?) floor as a starting point.

So then what? Well, after considering about 183 different options, I think I am going to do a dado, made from upcycled cabinet door parts. I am quite partial to the look of this furniture piece I saw on this “Get the Look” post on the Etsy blog. Again, it reminds me of Morocco, where they reuse EVERYthing. I will need to cobble together a mix of old pieces and new pieces that I just make “look” old. I have been dying to check out Annie Sloan’s Chalk Paint, and think this will be the perfect opportunity to do just that AND utilize a bunch of unfinished cabinet doors that I’ve had sitting around for years now ;).

And what else?? Well I currently plan to cover the rest of the walls with an off-white organic plaster, and am DYING to do the ceiling with this pink color as seen in the May issue of Elle Decor (it’s in Marrakech-where else?!). This will probably be done with Sydney Harbour’s Interno Lime Wash.
This is unsurprisingly turning into quite a project….let’s just get the floor done first…BTW, if you were one of those who put off doing your taxes till the last day, you’re in luck! The IRS is giving you till the end of the day Monday! So….you can put it off till after the weekend….
April 8th, 2011
Rockin at Rocketown
It’s already been a couple of weeks since I attended and taught at the Concrete Decor Show, but it’s never to late to share a great project! I told you about it first here in this post. Besides teaching an 8 hour hands-on training class with Katrina Johnson from SkimStone, we left a fabulous finished floor at a very unique and deserving and thriving community center in Nashville called Rocketown. Rocketown was founded in 1994 by singer/songwriter Michael W. Smith as a place to give teens a positive alternative to the many negative pressures they face in the world these days.

The first of its kind in the Southeast, Rocketown has grown into a regional outreach as well as a model for faith-based relational outreach across the country. Their goal is to lead and inspire youth through creative programs and mentoring relationships that are culturally relevant and eternally significant. Participant circumstances span the range of neglect, abuse, poverty, absent parents and normal peer pressures. Rocketown engages local youth with a facility that houses a coffee bar; photography, art and dance, and recording studios; stages for live entertainment; and Middle Tennessee’s only indoor skate park. To date there have been more than 425,000 visits with an average of 1,350 teens from across Middle Tennessee participating in programs each week. It’s quite an amazing place, and we were happy to donate our time and materials to make it even more special, along with many other decorative concrete artisans who left their art in various rooms and areas throughout.

Audie Adams was one of many teens who actively participated and benefited from Rocketown’s programs and influence. A local stencil/graffiti artist, he has contributed much of the artwork that is found on the walls in the various studio rooms and offices. The project for Modello Designs and SkimStone was the recording studio/music room, and Audie provided the design inspiration that we adapted for the large floor graphic. I slightly simplified his original design concept to make it “doable” in two days and three layers, and Michelle did an awesome job of setting up the Modello stencil patterns in record time!

Katrina led off the class, which was a combination of hands-on and project demo, by discussing the basics of prepping for a SkimStone floor and mixing it all up. Her brother Pablo had done an awesome job of prepping the floor a couple of days early by applying a layer of their Bonding Primer over the existing finish.

Katrina and Pablo then power-troweled out the first coat of gray SkimStone over the Bonding Primer basecoat while the students looked on.

After a couple of hours drying time, I explained the design and stencil pattern process that we used and began the laying out the first layer of Modello stencils for the areas that were designated to be blue.

With all the vinyl stencils securely in place, we began applying an overlay of blue-tinted SkimStone. You can see the art canvas on the wall that Audie Adams created, which was the inspiration for the floor design.

With the blue color down and the first layer of Modello stencils removed, we began the next day…

…and laid down the second layer of Modello stencils to complete the white areas of the design.

The last layer of Modello stencils added the finishing touches in bold red.

The red areas of the design overlayed right on top of the blue. Because SkimStone is an integrally colored overlay, it is possible to adjust the color to make it either opaque or translucent. We did two quick trowel layers of red for complete coverage and began removing the stencil immediately.


And here is the finished floor after sealing with 4 quick coats of Penetrating Sealer the following day. Rocketown reports that everyone there is thrilled with the floor, and we were so happy to be able to leave this “gift” to them!

Meanwhile, as the floor was “in progress”, Katrina and I kept the students busy in the other room learning all the ins and outs of SkimStone and how to creatively incorporate Modello stencils for custom graphics and design additions. Phew! It was a very busy two days but everyone was left happy!! If you want to find out more about the Concrete Decor Show, Dana Tucker did a great overview post over on the Fauxology blog. Next year’s show will be in San Antonio, one of my favorite cities in the country of Texas!
February 25th, 2011
Get a New Look
One of the great things about having businesses that focus on creating awesome patterns for decorating just about any surface is that there are so many opportunities to work with different companies who have awesome PRODUCTS that can be used with our designs! Modello Designs has recently joined forces with New Look to see what kind of magic can be created with our Modello stencils and their easy-to-use, water-based concrete stains and environmentally friendly etching gel.

I popped in to the recent World of Concrete show in Las Vegas to visit with Jacob Webb, and the nice people from New Look at their booth there.

The simple process starts with 2 coats of their Solid Color Stain, (not shown) which comes in a ton of great colors and is easily broomed on. Then, one or more of their Translucent Designer Enhancer colors is applied with a spray gun through the Modello stencil pattern.

To soften the effect, a complimentary color can then be applied overall, after removing the Modello stencil.


Above are two examples of easy Marquetry effects that can be achieved by applying layers of color after different areas of the design are removed, one layer at a time.

The light “airbrushing” technique used with the Designer Enhancer Stains gives a nice, crisp edge to the patterns.

I was really excited about their QuickEtch etching gel! This is a water-based, biodegradable, non-corrosive surface etching solution that etches concrete surfaces WITHOUT acid. I have used acid-based etching gels in the past, and this works just as well without the hazard and worry of using a dangerous chemical. You can find more information on concrete etching with Modello patterns here and an example of a finished project here. I love the organic look of etched concrete, especially with the addition of Modello stencils! ![]() New Look has training and distribution throughout the country, and provides a great alternative to acid staining and etching! You can find more information about our New Look collaboration here on our website, as well as links to more information and some instructional videos.
New Look has training and distribution throughout the country, and provides a great alternative to acid staining and etching! You can find more information about our New Look collaboration here on our website, as well as links to more information and some instructional videos.
February 23rd, 2011
Stencil Patterned Porches
You’ve seen the amazing work of Gracie Reed, of Grace Designs Dallas here before. Her work is on the cover of our Modello by Design, Vol. II book and also featured in the whole first chapter. Gracie continues to inspire and amaze me with her talent and she recently sent along these juicy, colorful photos of some fabulous porch projects she did recently with some custom-fit Modello masking stencil patterns. And so, to brighten up your day…..He-e-e-e-r’s Gracie!

Porch before: yaaaaawn.


Porch after: YEAH!

I think you’ll agree with me that these are really exceptional uses of some of our Modello Concrete Carpet patterns, adapted to fit the projects perfectly. For these projects, Gracie used a polymer-based concrete overlay product called RSCrete from Faux Effects, International. Like the products featured in the last post, this is an easy to use, integrally colored overlay that gets thinly troweled over an existing concrete slab. It’s kind of like a Venetian Plaster type material-for floors-and works wonderfully in combination with our masking stencils! Wouldn’t you love to walk up to either one of these houses and be surprised to see this?!?!


 Copyright © Designamour